
The Tool Palette
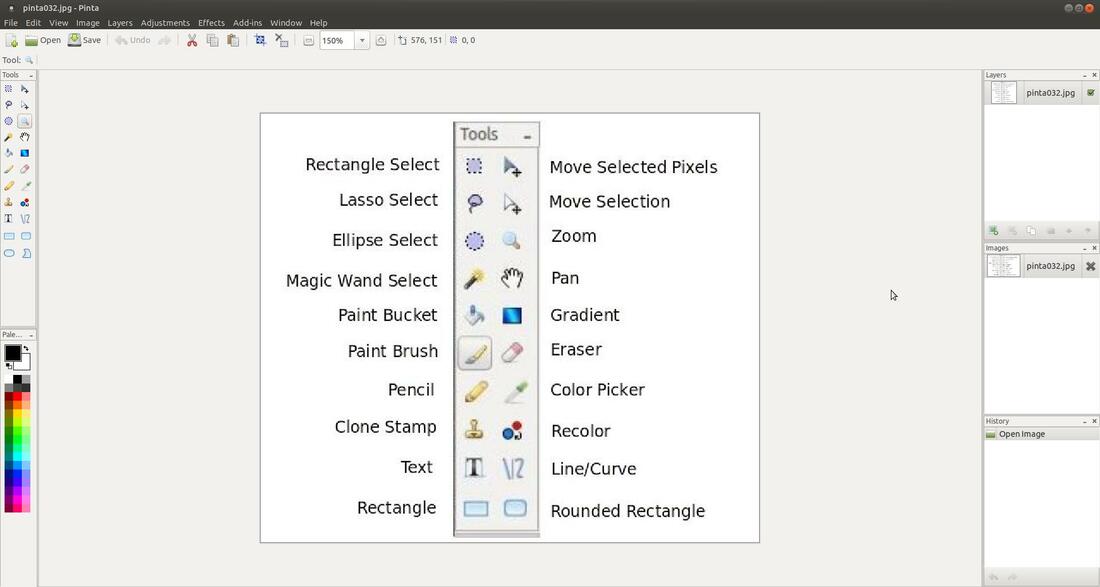
The Tool Palette (a.k.a. Drawing Tools) contains all of the basic tools you need to manipulate or edit an image. By default, it is located on the left side of Pinta. It is directly above the Color Palette. On the previous page or introduction page, I had a brief description of each of the tools in the Tool Palette. On this page, I will provide an illustration or animated image to each description to help you understand how each tool works. (Please be patient as the animated images load below.)
Rectangle Select - This tool is used to select portions of the picture. This tool selects rectangle sections only. When a portion of a picture is selected tools that are used will only work in the selected area. If a square selection is needed hold the shift key when selecting the area, this will make a square selection.
Move Selected Pixels - This tool is used to move, rotate and scale a selected section of the photo, or to move layers of the image made in Pinta.
Lasso Select - This tool is used to hand select which sections of the image you want selected. This is done by selecting this tool and the drawing around the portion of the image you want selected while holding down the left mouse button.
Move Selection - This tool is used to modify the size, rotation, and scale of what you are selecting. For example if you used to Rectangle Selection and made the rectangle too small for the area you wanted to select you can use this tool to resize and move the selection to where you want it to be.
Ellipse Select - This tool works in much the same way as the Rectangle Select except it select elliptical sections (like the rectangle tool if you hold shift down it will select a circle region instead of an ellipse).

Zoom - This tool is used to view the image being worked on more closely. After selecting this tool click on the section of the image you wish to view more closely. Left click to zoom in. Right click to zoom out. Click and drag to zoom in selection.
Magic Wand Select - The magic wand tool is used to select sections of the image that are similar. This tool can be adjusted to grab more or less of the image that resembles where it was used. You need to increase the Tolerance number to select more of an image that resembles the area you used or decrease the Tolerance to select less of an area that resembles the area you used.
Pan - This tool is used to move around in the image when the image is larger than the screen. To use this tool click in an area (the best area to select is somewhere in the middle of the picture) then hold down the left mouse button and move the cursor. The image will move as if you grabbed the image where you clicked and pushed or pulled the image in the direction that you moved the cursor.
Paint Bucket - This tool is used to fill areas of similar color with another solid color. Left-click to fill a region with the primary color, right-click to fill with the secondary color. You need to increase the Tolerance number to select more of an image that resembles the area you used or decrease the Tolerance to select less of an area that resembles the area you used.
Gradient - This tool is used to gradients in colors as well as image fading between images. Each gradient type is chosen from the Tool Bar. Color gradients are rendered as a transition between the Primary and Secondary colors. The Gradient Tool also supports a transparency mode which can be used to "fade" or "blend" two images together. There are many more options to the Gradient Tool. I will create a section on Gradient Tool.

Feb 21, 2019
