Learn Ubuntu MATE
  • Home
    • Screen Tearing on Intel Graphics
    • Screen Tearing on AMD Graphics
    • How to install Realtek WiFi Driver >
      • How to install Realtek WiFi Driver (Pt 2)
    • Authentication is Required to Mount
    • Traditional Menu
    • Software >
      • App Grid
      • AppCenter
      • GNOME Software
      • Modern Apps
    • Welcome & Software Boutique
    • Remove Welcome & Software Boutique
    • TeamViewer
    • Simple How to Tips >
      • Change Wallpaper
      • Pin a Program
      • Change Date & Time
      • Enable Screensavers >
        • Cosmos Screensaver
      • Decrese Icon Padding
      • Enable Magnification
      • Fading Windows
      • Replace Clock Indicator
      • Remove Media Players
      • Create a Submenu
      • Remove the Collection Menu
      • Preferred Applications
      • Upgrade LibreOffice
      • Install Fonts >
        • Install New Fonts
      • Play a DVD
      • Enable Livepatch
      • Update Software
      • Unresponsive Program
      • Install HWE >
        • Install HWE 20.04
      • Open HEIC Images
      • Open WebP Images
      • USB Flash Drive
      • No Audio
      • Screen Flickering
      • Screen Blanking
      • Draining Battery
      • Reduce Shutdown Time
      • Create a Mount Point
      • Thunderbird Emoticons
      • Sound Preview
      • Failed To Download >
        • Failed to Download (#2)
      • Enter Password to Unlock
      • Two Wifi Icons
      • System Program Problem
      • CD Burner Issue
      • Firefox Homepage Fix
      • VLC Closes Fix
      • Desktop Error
      • Trash Bin
      • MATE Weather Applet
      • OpenGL: renderer: llvmpipe
      • PolicyKit vulnerability
    • Install Ubuntu MATE >
      • Burn an ISO to DVD
      • Create a Bootable USB
      • Upgrade Ubuntu MATE
  • Ubuntu MATE
    • How to Scan
    • How to Take a Screenshot
    • How to View a PDF File
    • Multiple Workspaces
    • Software Updater
    • Archive Manager
    • How to Burn CD/DVDs
    • Setup & Use Email >
      • Email Filter
    • Firefox Web Browser
    • Shotwell Photo Manager
    • Image Viewer
    • Caja File Manager
    • Trash
    • Play Videos
  • Additional Software
    • Antivirus >
      • BitDefender Antivirus
      • ClamTK Antivirus >
        • Clamscan Antivirus
        • ClamTK Caja Add-on
      • Comodo AntiVirus
    • Archive Managers >
      • Archive Manager
      • Ark
      • B1 Free Archiver
      • P7Zip-Desktop
      • PeaZip
      • Xarchiver
    • Browsers >
      • Brave
      • Chrome
      • Chromium
      • Falkon
      • Firefox
      • GNOME Web
      • Iridium Browser
      • LibreWolf
      • Microsoft Edge
      • Midori
      • Min Browser
      • NAVER Whale
      • Opera
      • Otter
      • Pale Moon
      • SeaMonkey
      • Sidekick
      • Slimjet Browser
      • SRWare Iron
      • Ungoogled Chromium
      • Vivaldi
      • Waterfox
      • Yandex Browser
    • Office Applications >
      • Couturier
      • PDF-Shuffler
      • PDF Studio Viewer
      • Xournal
      • Foxit Reader
      • Okular
      • gLabels >
        • Multiple Name Badges
        • CD & DVD Labels
        • Business Cards
        • Mailing Address Labels
        • Return Address Labels
      • Spice-Up
      • Stickynotes
    • Educational Programs >
      • Galculator
      • GeoGebra Classic
      • GNOME Calculator
      • KCalc
      • NumWorks
      • Pebbles
      • Qalculate!
      • QT-Calculator
      • How To Install R >
        • Install R Commander
        • Install RStudio
      • SpeedCrunch
      • TI-83 Plus
      • TI-84 Plus CE
      • KWordQuiz
      • Granule
    • Graphics >
      • 4K Slideshow Maker
      • Imagination
      • Gnome Screenshot
      • Ksnip
      • Shutter >
        • Shutter 0.94.3
      • PhotoFlare
      • Pinta >
        • Tool Palette >
          • Tool Palette (Cont)
        • File Menu >
          • Screenshot Tool
        • View Menu
        • Edit Menu >
          • Palette
        • Image Menu >
          • Image Size
        • Layers Menu
        • Adjustments Menu
        • Effects Menu >
          • Red Eye Removal
          • Pixelate
        • Add-ins Menu
        • Window Menu
        • Help Menu
        • Restore Layout
        • Pinta 1.7
        • Pinta 2.0.1
      • Bing Wallpapers
      • Variety Wallpaper
      • Converseen
      • Curtail
      • Imagine
      • ​Annotator
      • Aliza MS
      • Brightness Controller
      • Photoprint
      • Peek
    • Image Viewers >
      • Deepin Image Viewer
      • Eye of Gnome
      • Fotoxx
      • Geeqie
      • GPicView
      • gThumb
      • Gwenview
      • Mirage
      • nomacs
      • PhotoQt
      • Phototonic
      • Pix
      • Qimgv
      • qView
      • Ristretto
      • Viewnior 1.6 >
        • Viewnior 1.7
      • XnView MP
      • Xviewer
    • Music Players >
      • Amarok
      • Audacious
      • Clementine
      • DeaDBeeF
      • foobar2000
      • Guayadeque
      • Lollypop
      • Museeks
      • Noise Music Player
      • Pragha
      • Quod Libet
      • Rhythmbox
      • Sayonara
      • Strawberry
      • Violin
    • Networking >
      • Dukto
      • LAN-Share
      • Nitroshare
      • Warpinator
    • Utility Software >
      • BleachBit
      • Stacer
      • Ubuntu Cleaner
      • CPU-G
      • CPU-X
      • Hardinfo
      • I-Nex
      • Caffeine
      • Conky >
        • Widgets & Themes
        • Title Bars
      • deb-get
      • GNOME Split
      • GParted
      • GtkOrphan
      • Ice SSB >
        • MS Office Online
        • Pixlr Editor
        • Photopea
      • KRename
      • KShutdown
      • Magnus
      • Radeon Profile
      • Ubuntu Mainline Kernel Installer
      • Y PPA Manager
    • Sound & Video >
      • Avidemux >
        • Merge Videos
        • Cut Videos
        • Crop Videos
      • Selene
      • Radio Tray >
        • Radio Tray Lite
      • Pithos
      • Spotify
      • Asunder
      • EasyTag
      • SimpleScreenRecorder
      • OBS Studio
      • FF Multi Converter
      • FFmpeg
      • SoundConverter
      • MediaInfo
      • Bomi
      • Gnome MPV
      • MPlayer
      • SMPlayer
      • VLC Media Player
      • HandBrake >
        • Convert A Video
    • Entertainment >
      • Hypnotix
      • IPTVnator
      • Airy TV
      • Crackle
      • Plex Live TV
      • Pluto TV
      • Popcornflix
      • Stirr TV
      • Tubi TV
      • Xumo TV
      • YouTube Movies
      • Plex Media Server
      • Emby Media Server
    • Themes & Colors >
      • Themes
      • Installing Themes
      • Customize Themes #1
      • Customize Themes #2
      • Change App Icons
  • Reviews
    • YouTube Reviews >
      • Ubuntu MATE 16.10
      • Ubuntu Mate 17.04
      • Ubuntu MATE 17.10
      • Ubuntu MATE 18.04
      • Ubuntu MATE 20.04
      • Ubuntu MATE 22.04
  • Info
    • How Safe are Your Paasswords >
      • Cyber Security Leaks
      • Hotmail Leak
      • YaHoo Leak
      • Windstream Hacked
    • Windows 7
    • Wireless USB Adapters
  • About
    • In Memory of ...

How-To Install Ubuntu MATE

In this section, I will teach you how to install Ubuntu MATE on your device. I will be using Ubuntu MATE 18.04.1 for my illustrations; however, the instructions below should help you understand how to install newer versions as well.
Picture
Downloading Ubuntu MATE
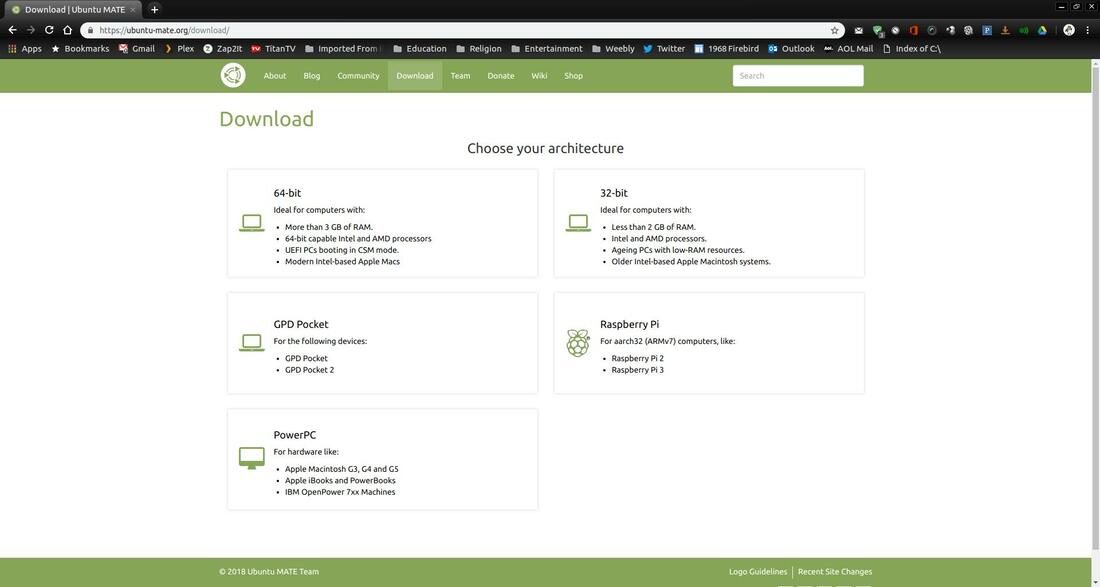
In order to install Ubuntu MATE you must first download a copy of it. Go to the official Ubuntu MATE website and select the architecture that matches your system. (https://ubuntu-mate.org/download/) I currently have a 64-bit system, so I selected the 64-bit option.
Picture
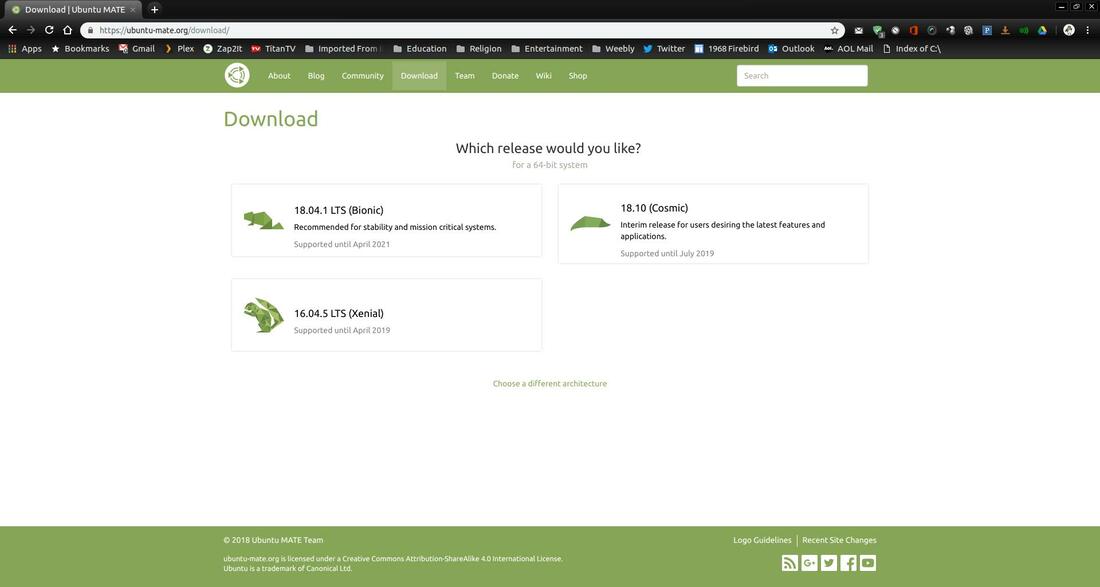
If you are a new user to Linux, I highly recommend that you install the LTS version. The LTS (Long Term Support) version will provide you with longer support and it is recommended for those looking for stability. I selected version 18.04.1 LTS (Bionic) around the time of creating this webpage. I recommend that you select the most current LTS from their website. 
Picture
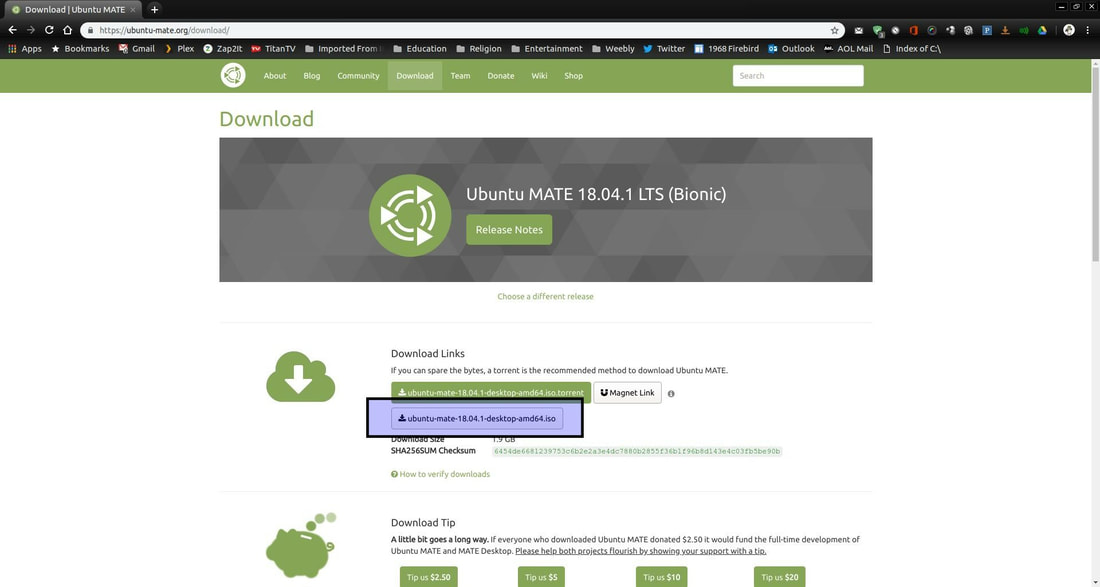
You can download Ubuntu MATE LTS ISO image using the direct link (highlighted in the image below) or you can download it via torrent.
Picture
You will need to make a bootable DVD or USB in order to install Ubuntu MATE.
How-To Create a Bootable Media
Select one of the links below to help you create a bootable DVD or USB.
   * How-To Burn an ISO Image File to a DVD
   * How-To Create a Bootable USB Drive in Windows using Etcher
How-To Boot Your System From a DVD or USB Drive
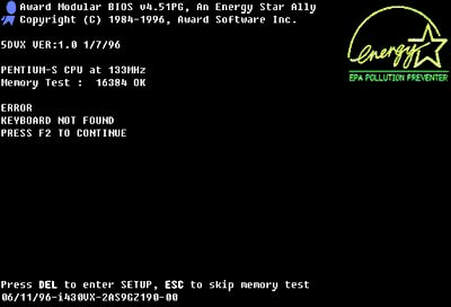
You must set a boot priority for your bootable DVD or USB drive so that your machine will start from that device. Your DVD or USB drive must have a boot sequence priority over your hard drive. You'll probably have to make some changes in your BIOS setting screen in order for that to happen. BIOS (Basic Input Output Subsystem) is a programmable chip that controls how information is passed to various devices in your system. A common way to access the BIOS settings screen is to press ESC, F1, F2, F8 or F10 during the boot sequence. In my example below, you see a message in the lower left corner that says, "Press DEL to enter Setup." If you are able to press the DEL key at that moment, it should take you into your BIOS setting screen.
Picture
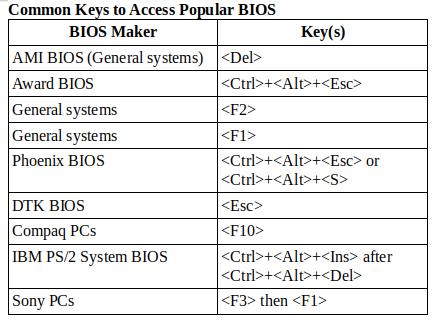
Below is a table that provides a list of BIOS Manufacturers and key or keys needed to be pressed during the bootup or startup or your machine.
Picture
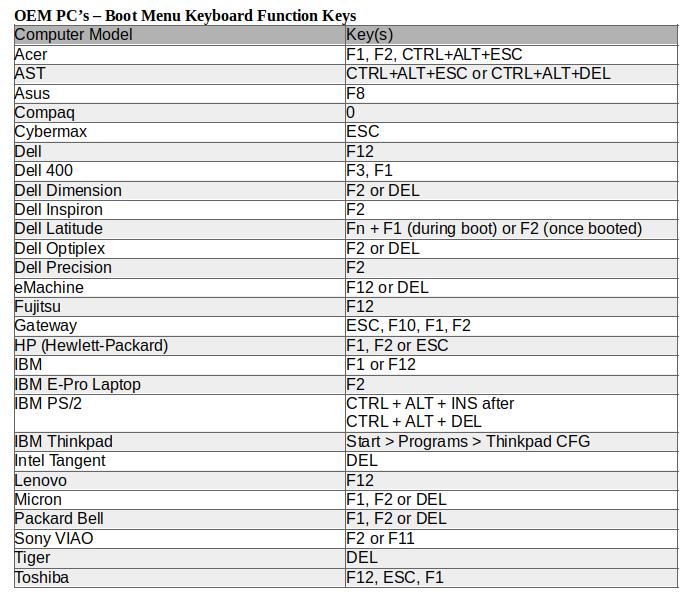
Below is another table that provides a list of computer models and keys needed to be pressed during the bootup or startup or your machine.
Picture
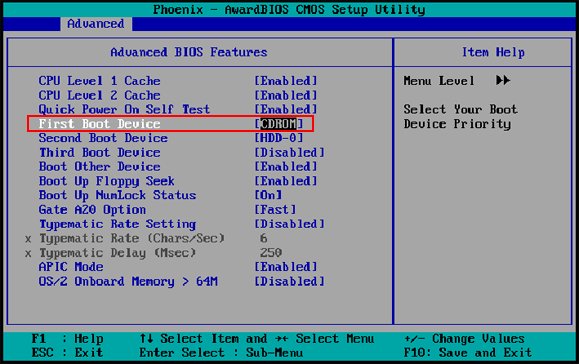
Once you are in the BIOS setting screen, move to the Boot section (you may have to select an "Advanced BIOS Features" within the Boot section). If you plan to Boot from the DVD then set CDROM or DVD as the "First Boot Device." If you plan to Boot from the USB drive and your computer supports it then set your "First Boot Device" as USB. 
Picture
You can then back out to the main menu and "Exit" and select "Exit & Save Changes" or you might be able to press the "F10" key to "Save and Exit" This is what worked in my example. You may have a completely different BIOS Manufacturer and your settings look completely different, but you should have the knowledge to look through your BIOS Settings screen and set your first Boot device to match the media you put Ubuntu MATE on.
For additional help changing the Boot order of your machine, check out the sites below:
   How to Change Boot Order on HP Laptop/Desktop
   Change the Boot Order in BIOS
Installing Ubuntu MATE
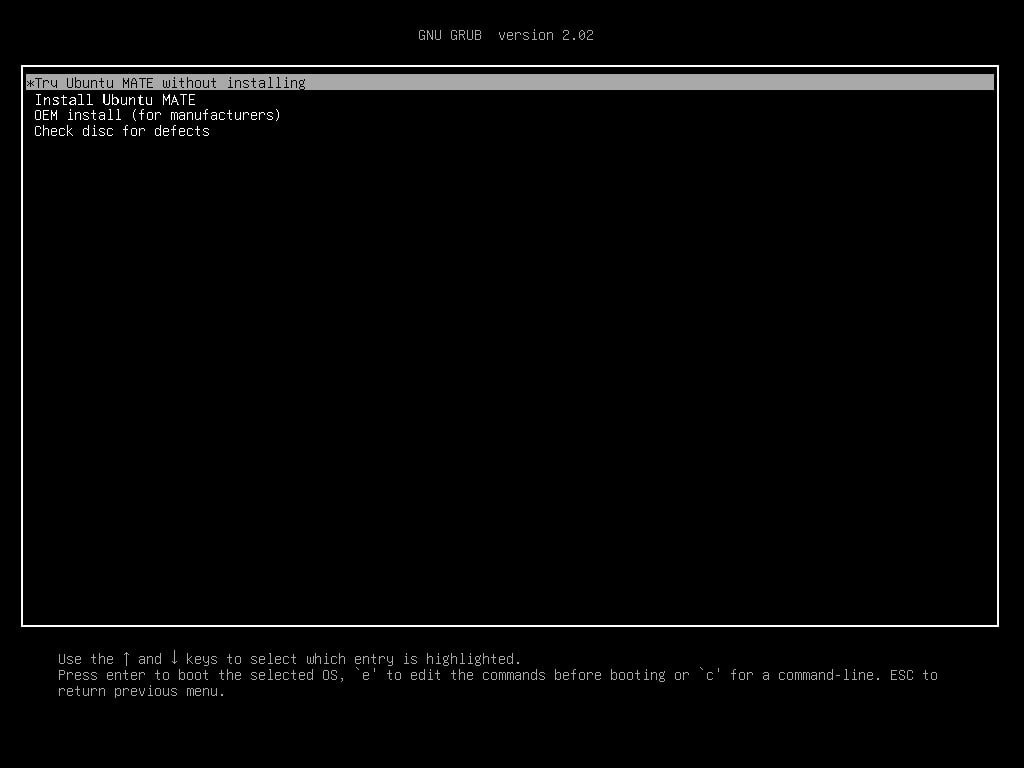
Insert your Ubuntu MATE media and reboot or restart your computer. If your settings in the BIOS were correct, you should see the following screen. Select "Try Ubuntu MATE without installing" and press the Return or Enter key. 
Picture
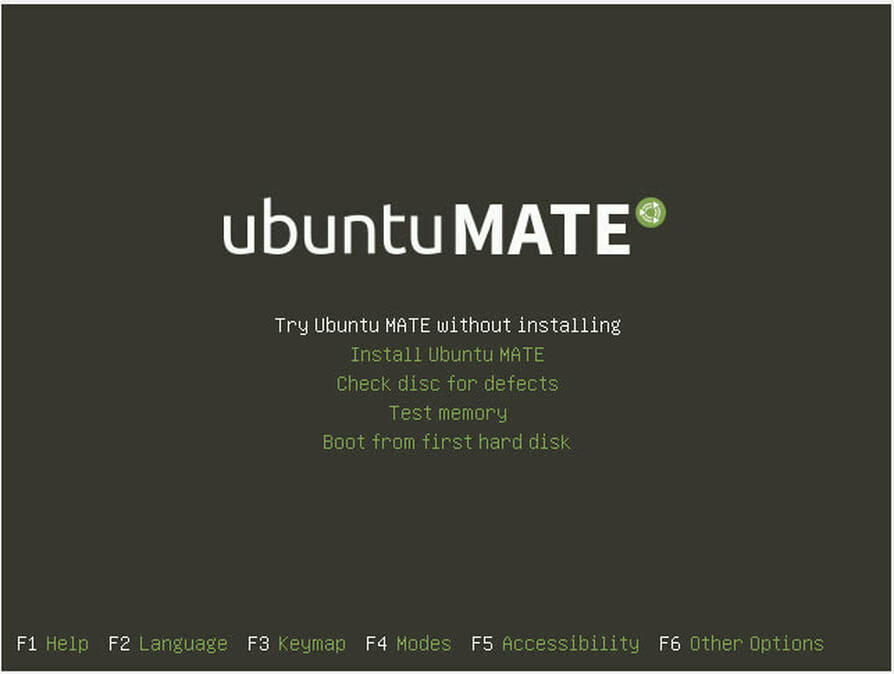
You might also see a screen like the one below. You also have the capabilities of trying out Ubuntu MATE or installing it. If this is your first time installing on your computer, I recommend that you try it before you install it. That way you'll notice if it has any issues with your system.
Picture
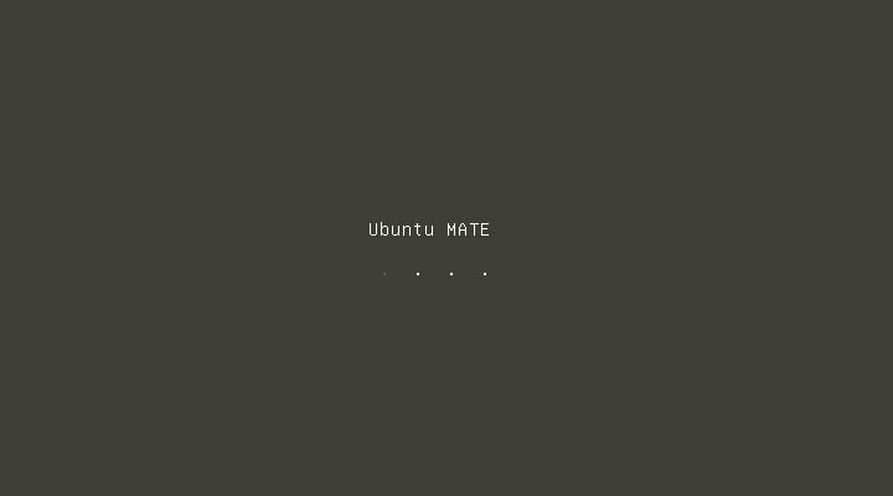
You'll notice a few dark screens while it's preparing the operating system for you to try it out. Just be patient, it won't take long.
Picture
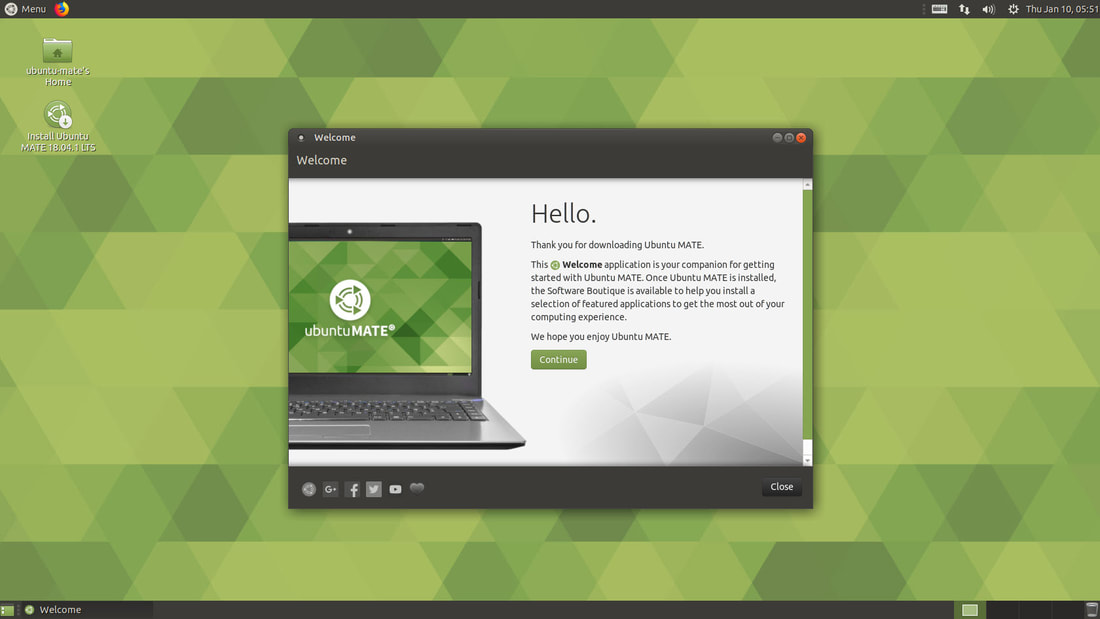
Soon, you'll see a screen like the one shown below. I recommend that you click the Close button and try it out for a few minutes to make sure it will work on your computer. If everything works the way you like it then click on the Install Ubuntu MATE LTS icon to install it on your computer.
Picture
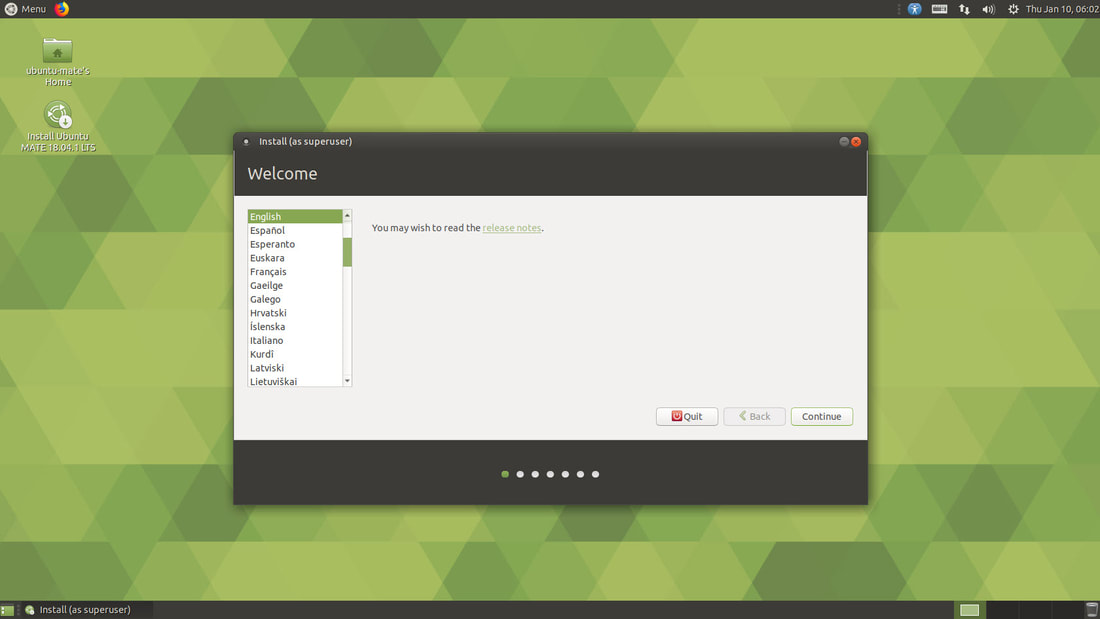
Select your language and then click on the Continue button.
Picture
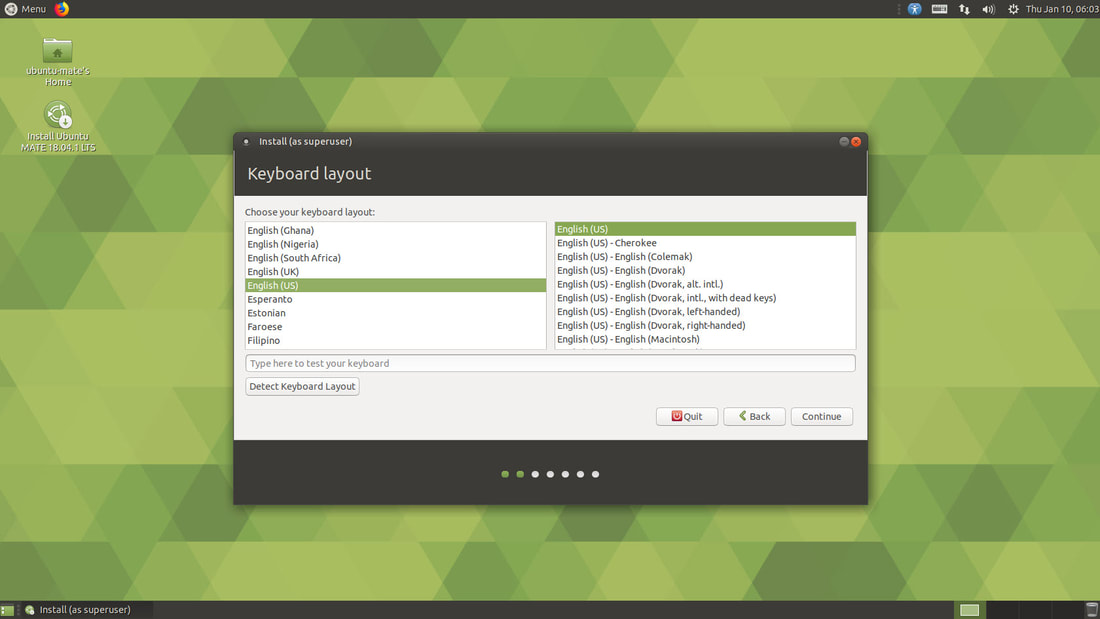
Select your keyboard layout and then click on the Continue button.
Picture
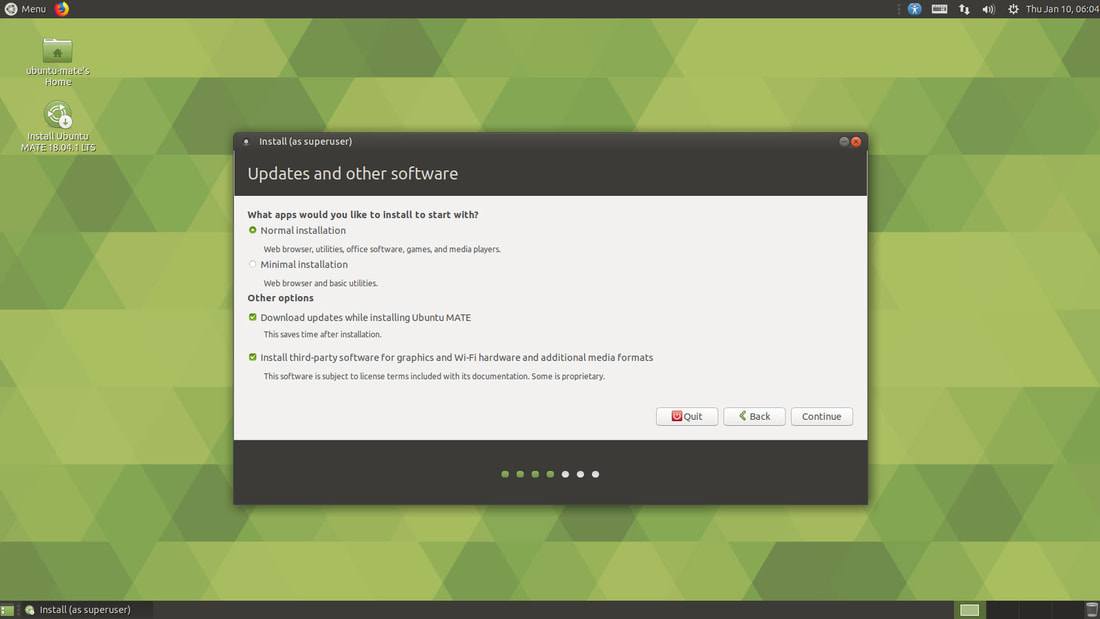
For first time users, I recommend that you click on Normal installation and select the two options under the Other options section. Click on Download updates while installing Ubuntu MATE and Install third-party software for graphics and Wi-Fi hardware and additional media formats. Before you click on the Continue button, make sure that you are connected to the Internet via Ethernet cable or Wi-Fi. You can click on the Wi-Fi icon in the upper right corner and enter your Wi-Fi name and password. Once you have your system online, you are ready to click on the Continue button.  
Picture
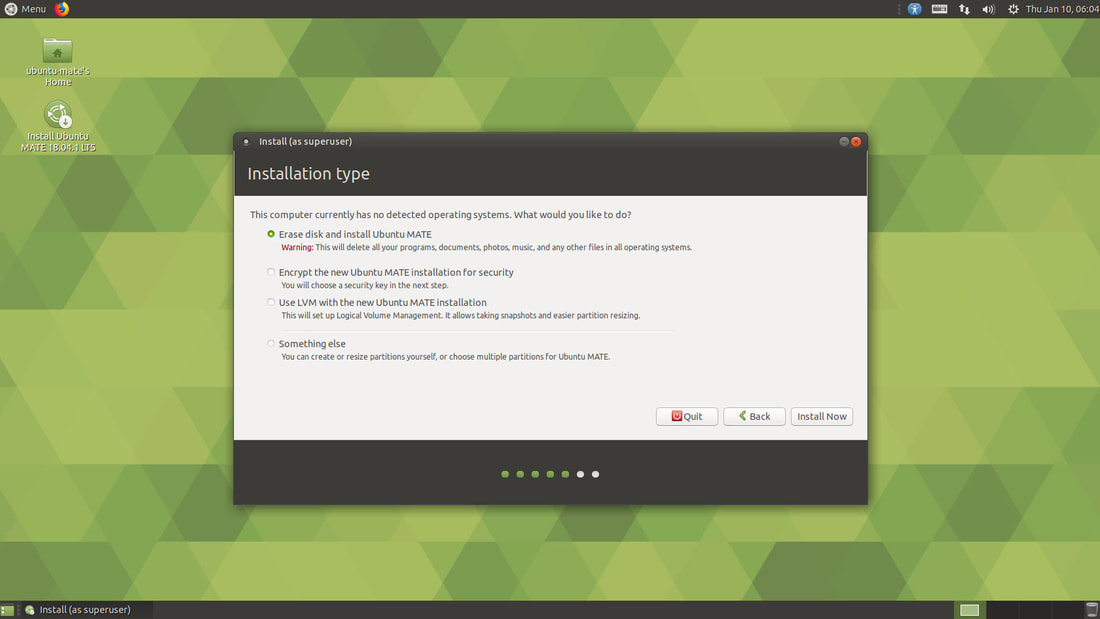
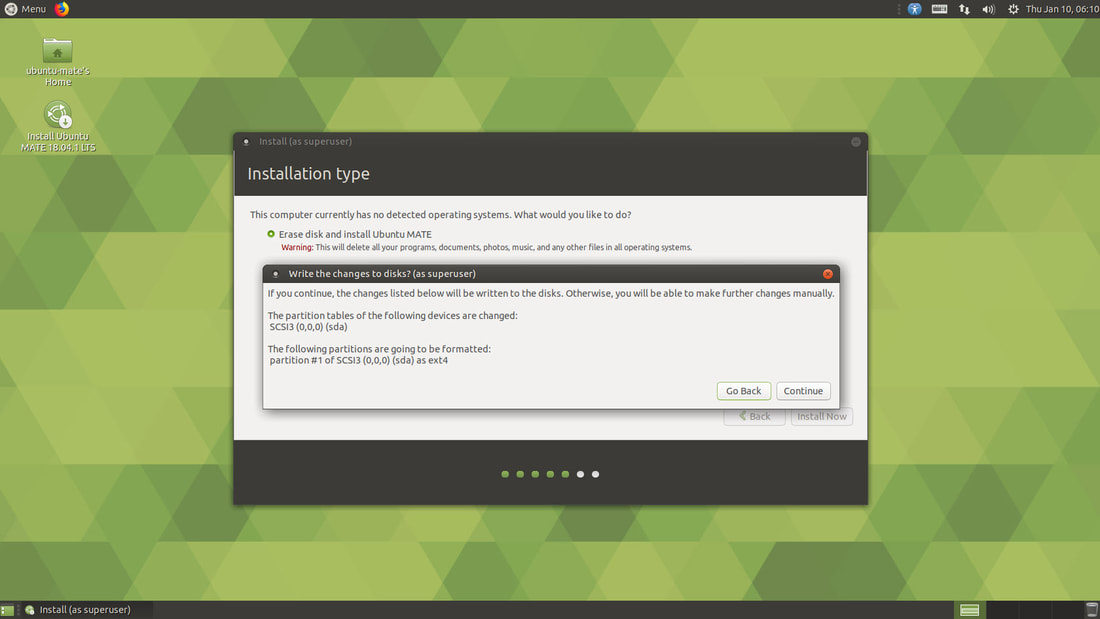
Select Erase disk and install Ubuntu MATE to prepare your hard drive for your new operating system. Then click on the Install Now button to start the process.
Picture
Click on the Continue button when the Write the changes to disks? (as superuser) dialog box appears.
Picture
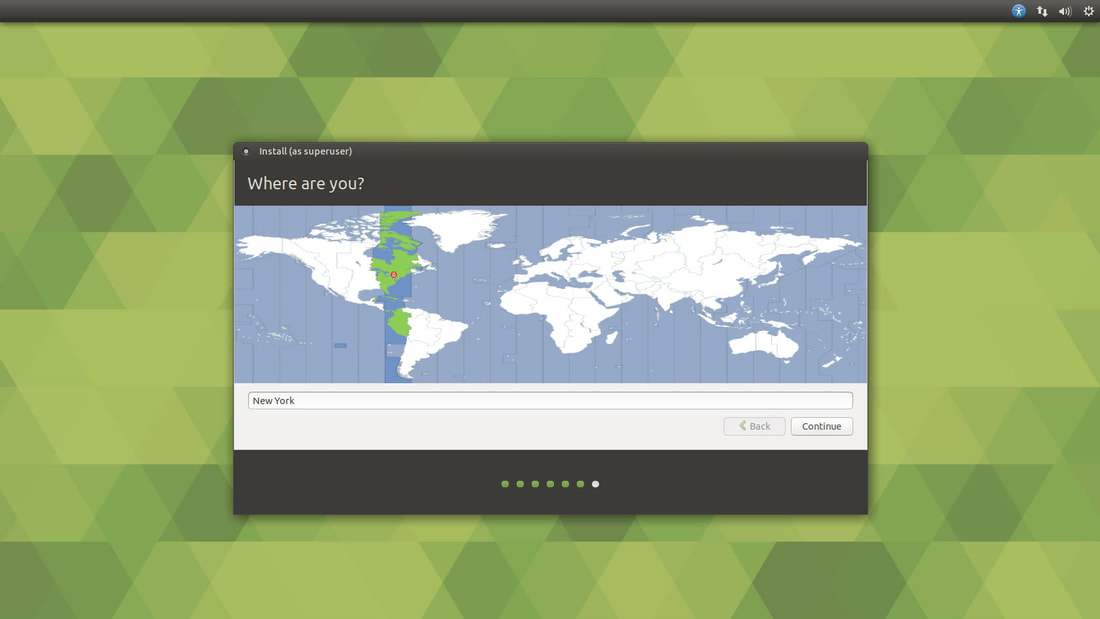
Now select your location and then click on the Continue button.
Picture
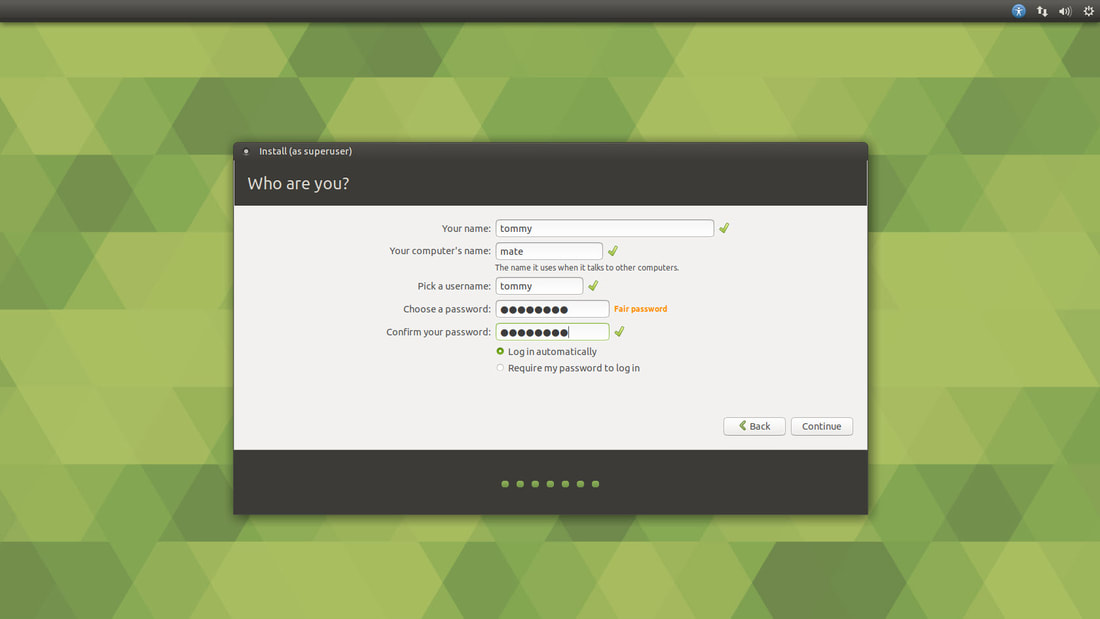
Enter your personal information such as your name, your computer's name, your username, your password, and whether or not you want to log in automatically or if you are required to enter your password to log in. Since this my home computer, I selected to log in automatically. Then click on the Continue button.
Picture
This will start copying files from your Bootable media to your hard drive. It will take a few minutes, so be patient.
Picture
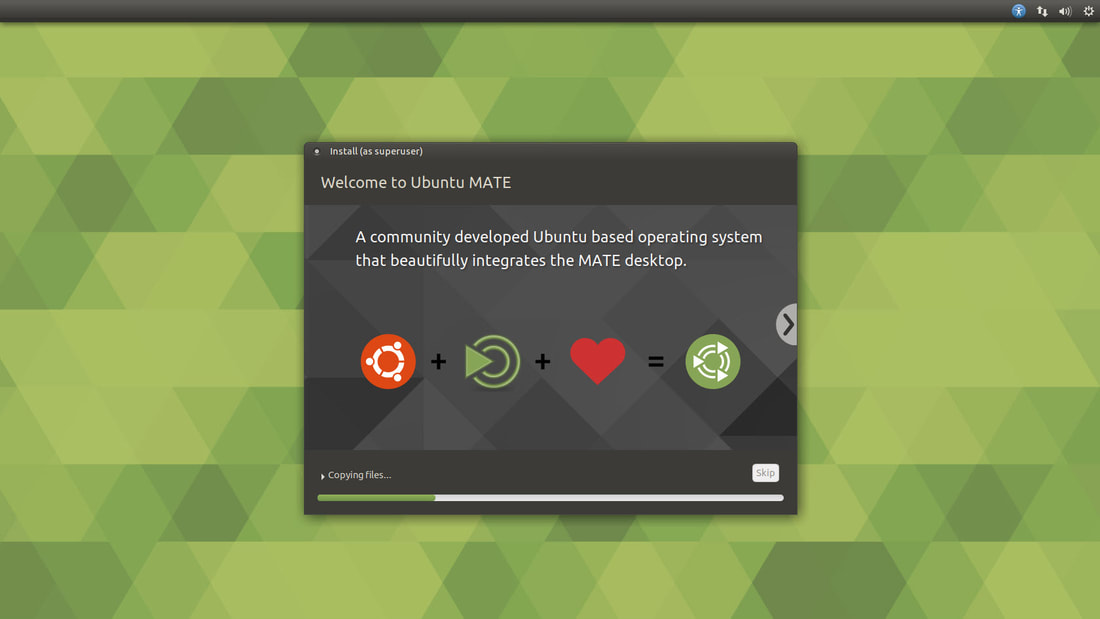
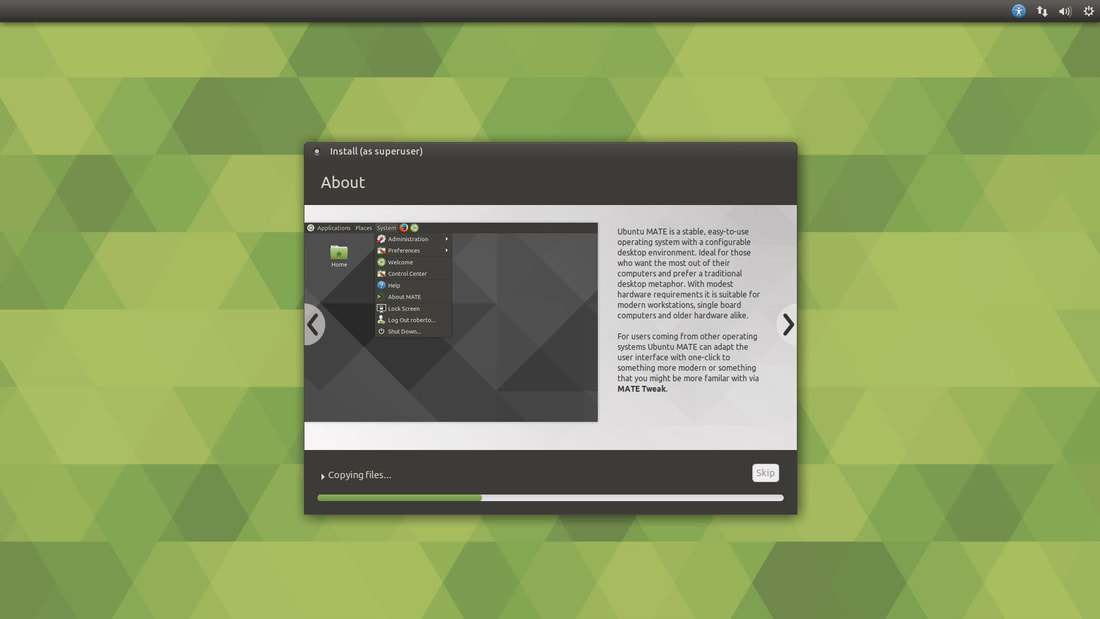
You'll notice the the image in the Install (as superuser) dialog box will change many times throughout the installation process. This will keep you entertained while educating you on your new operating system.
Picture
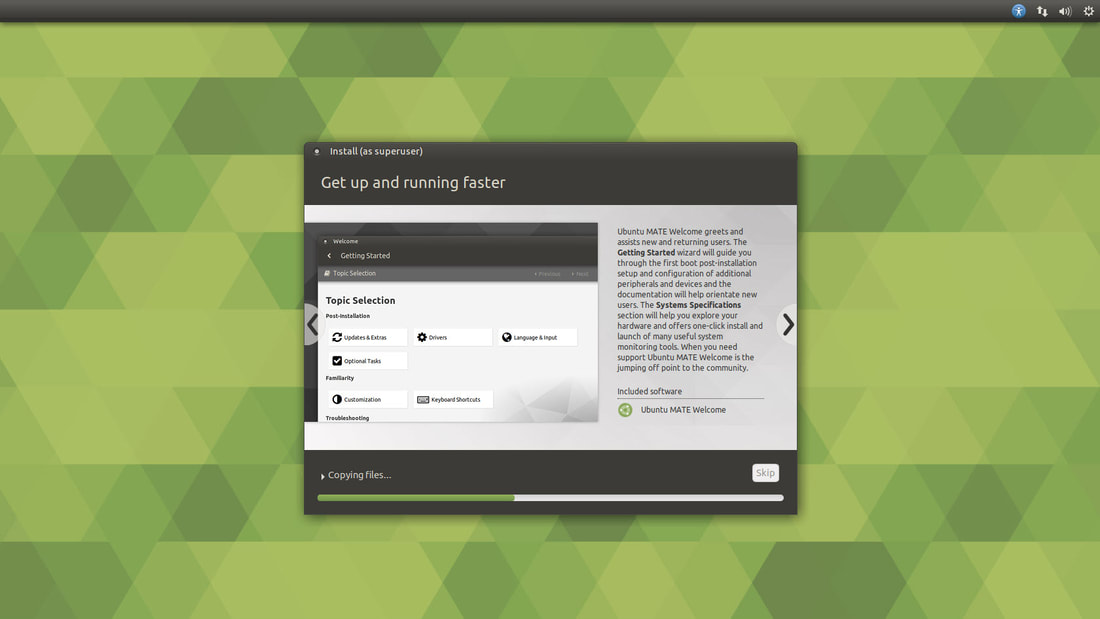
The next image during the installation process. This screen will explain how the Getting Started wizard will guide you through the first boot post-installation setup and configuration of additional peripherals and devices and the documentation needed for new users.
Picture
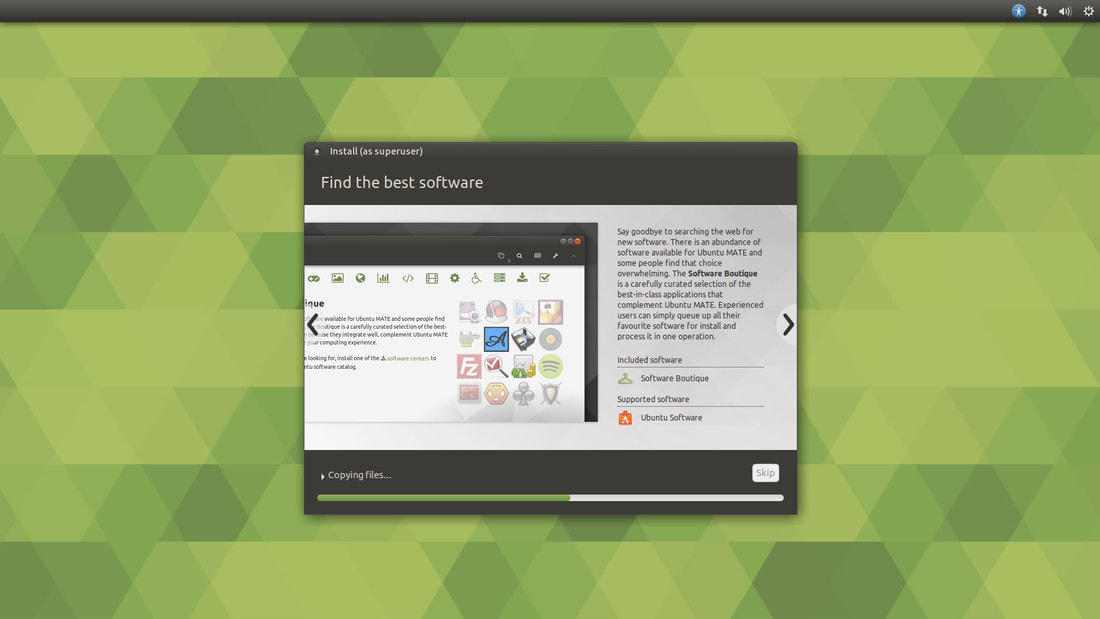
The next image during the installation process. This screen will explain how you find software to install on your new operating system.
Picture
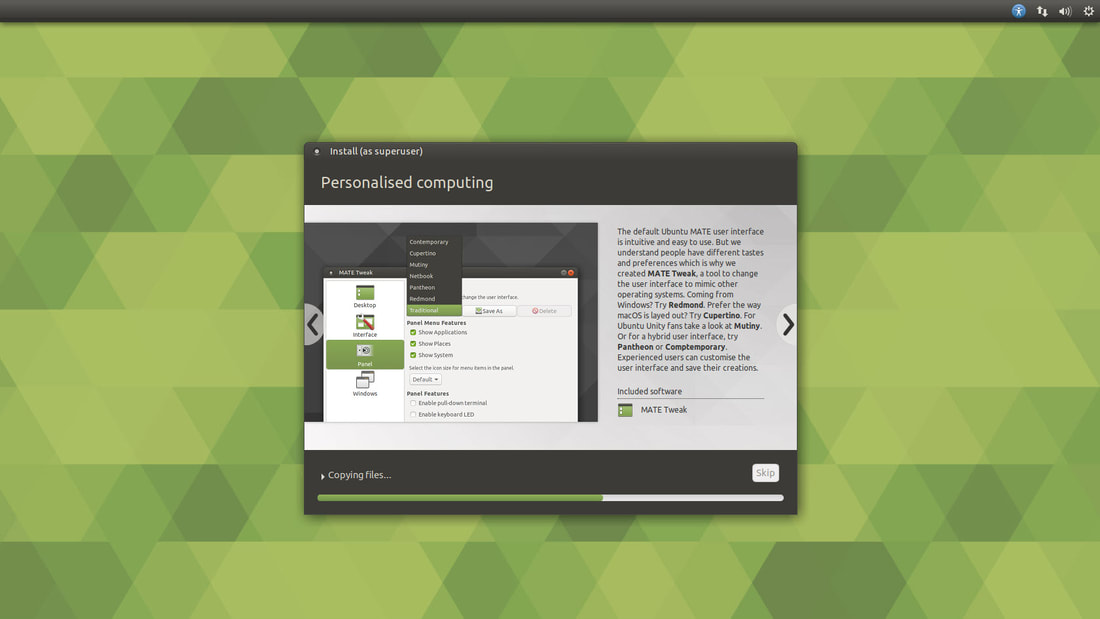
The next image during the installation process. This screen will explain how you can customize the look of your new operating system.
Picture
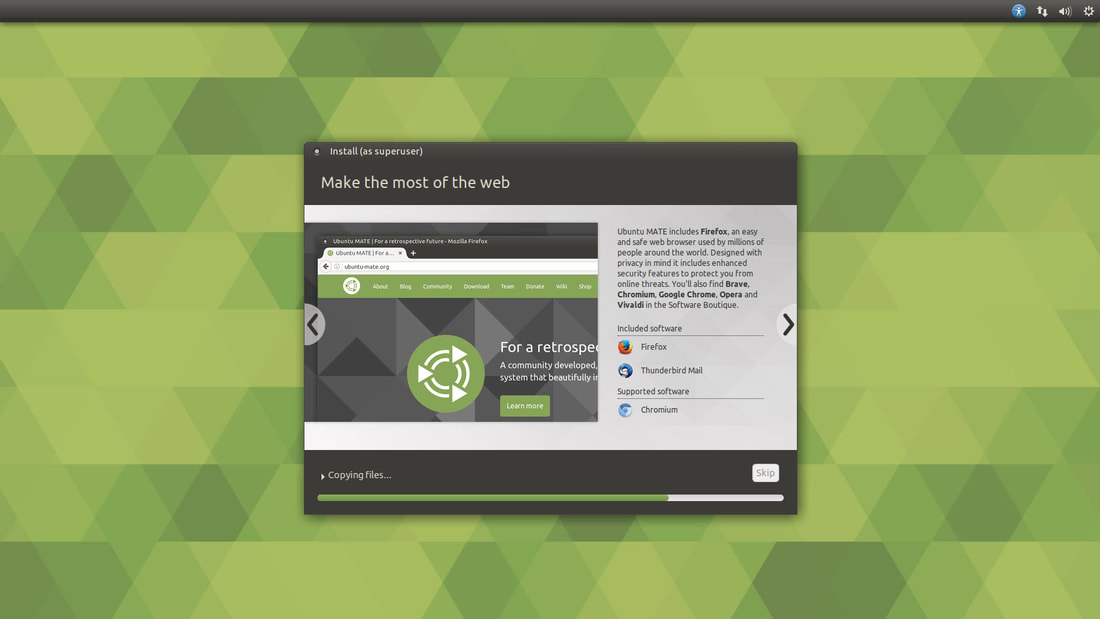
The next image during the installation process. This screen will explain the software or browsers you can install to sure the Internet.
Picture
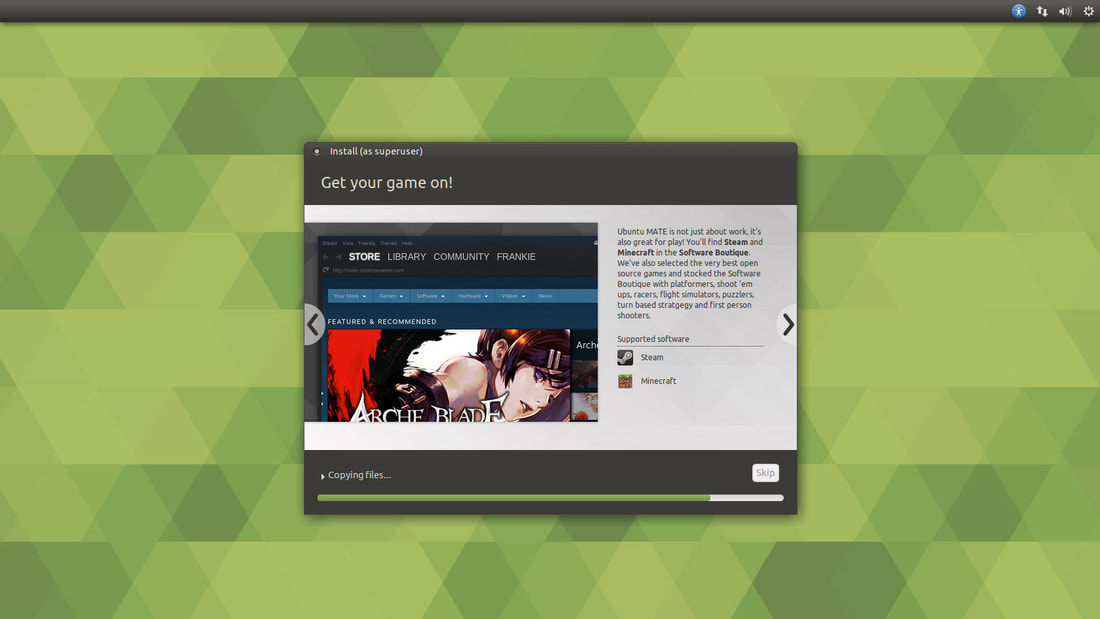
The next image during the installation process. This screen will explain how you can play games on Linux.
Picture
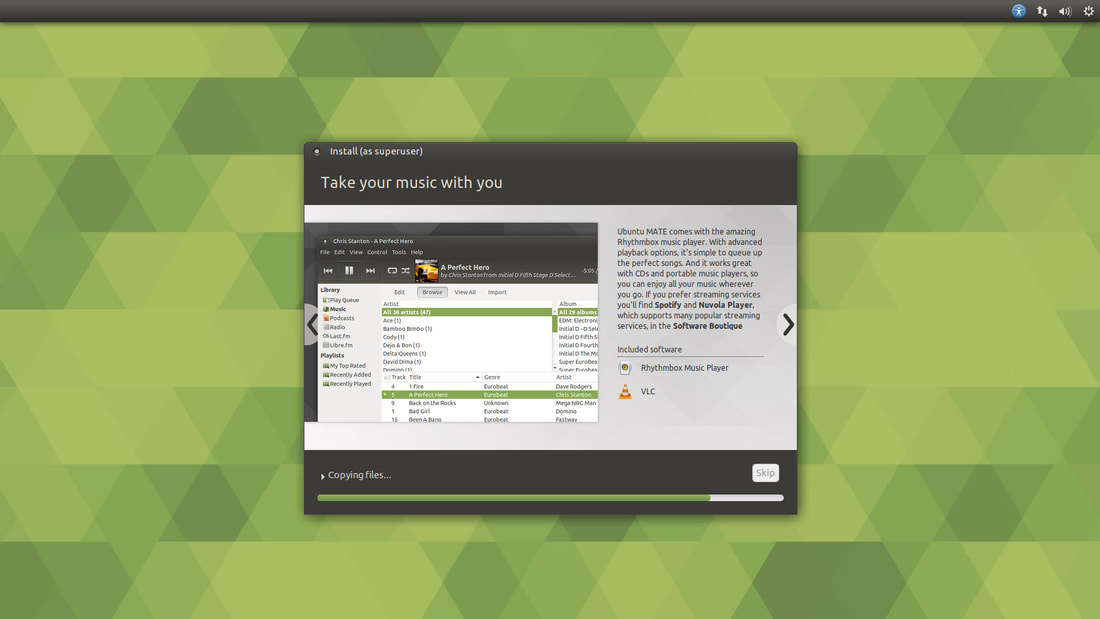
The next image during the installation process. This screen will explain how you can listen to your favorite music and other multimedia content.
Picture
 The next image during the installation process. This the point where the copying files ends and the actual installation process begins.
Picture
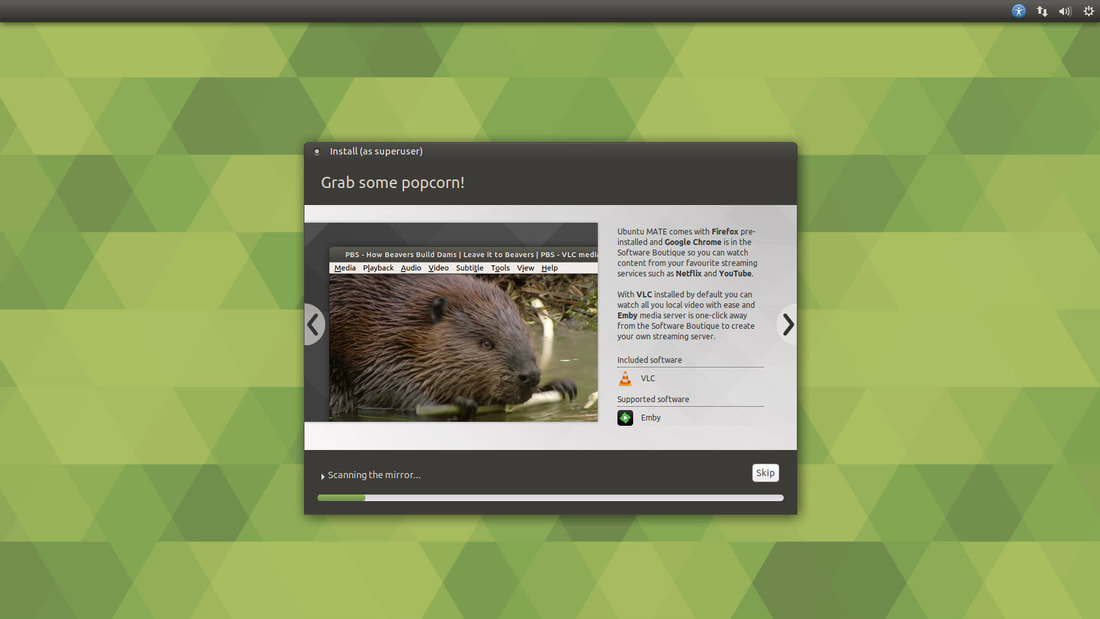
 The next image during the installation process. This screen explains how you can watch streaming services like Netflix and how you can setup your own media server. 
Picture
 The next image during the installation process. This screen explains how you can use LibreOffice as an alternate to MS Office.
Picture
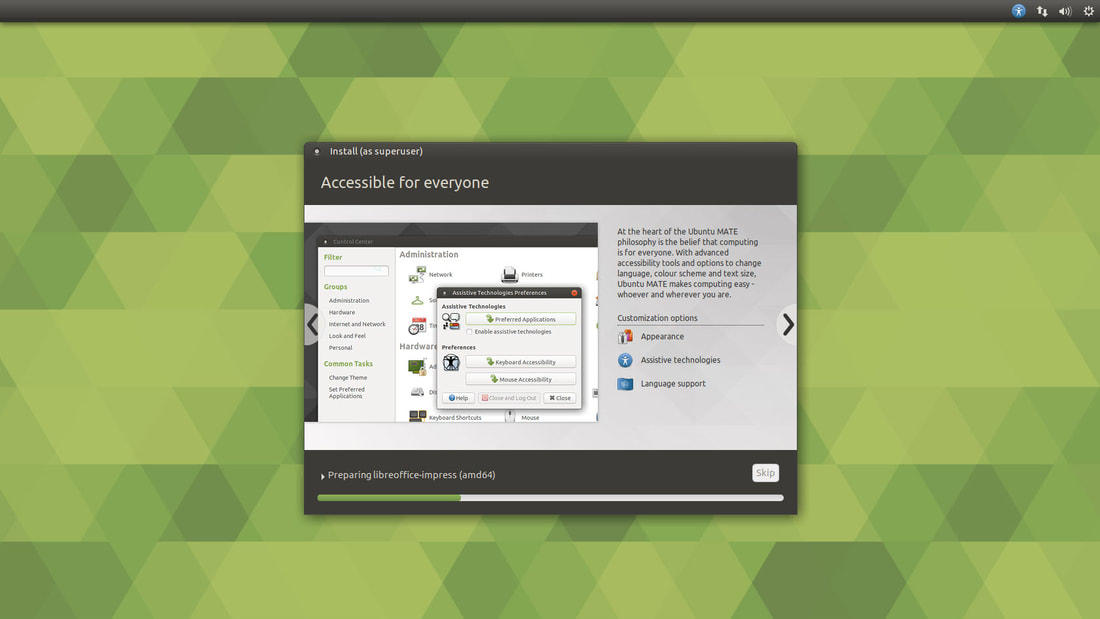
 The next image during the installation process. This screen explains how Ubuntu MATE is designed to be used by everyone.
Picture
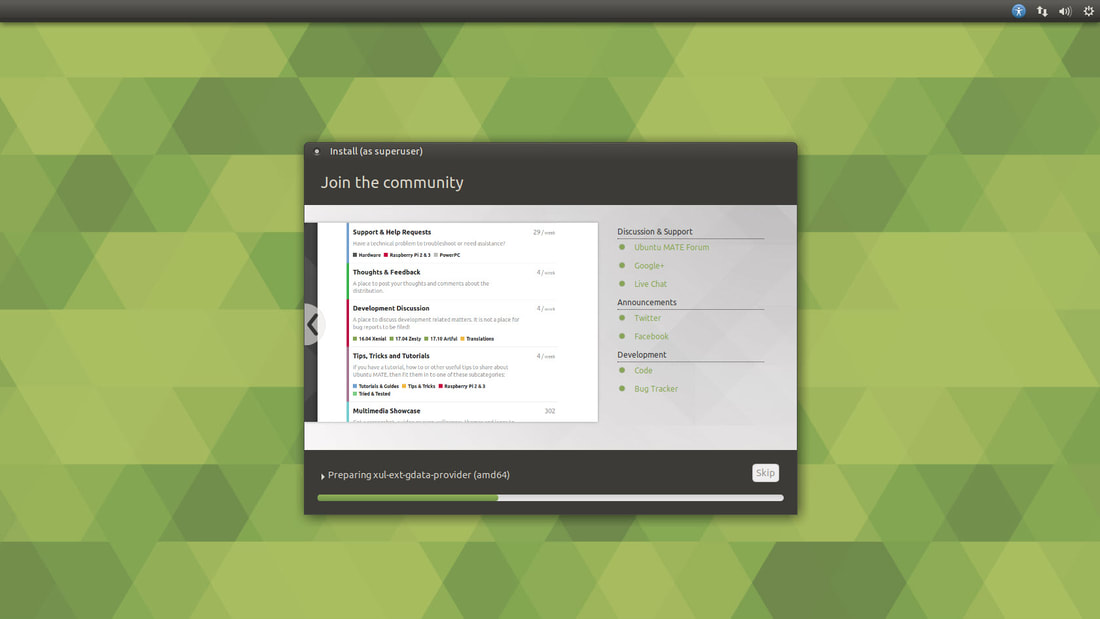
 The next image during the installation process. This screen illustrates ways to communicate to the Ubuntu MATE community.
Picture
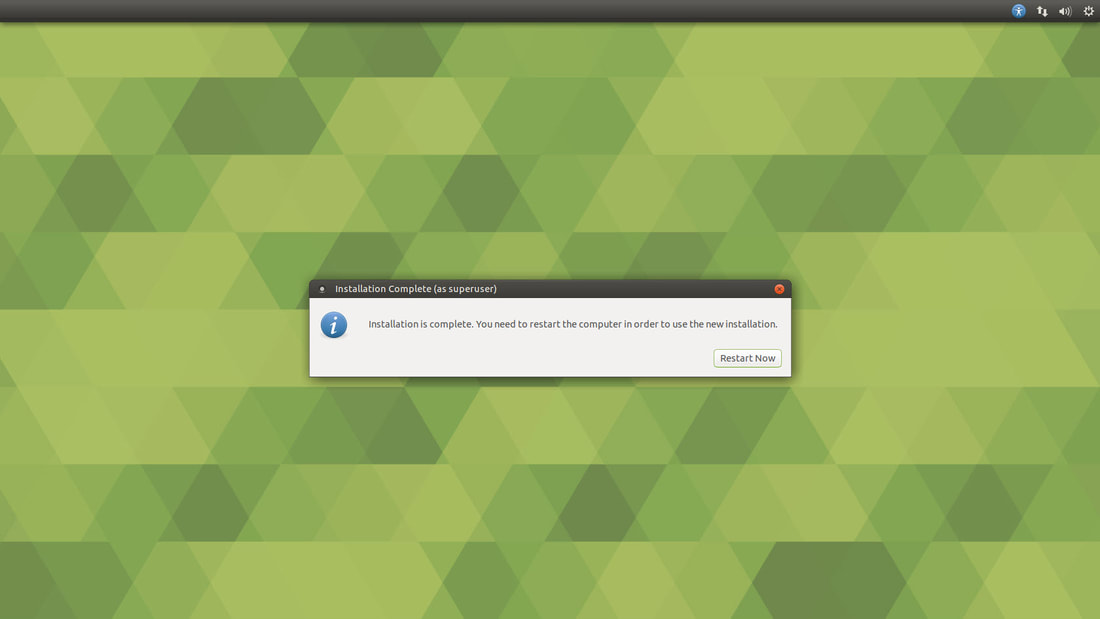
Once the installation is complete, click on the Restart Now button.
Picture
Some dark screens will appear as Ubuntu MATE finalizes the installation process.
Picture
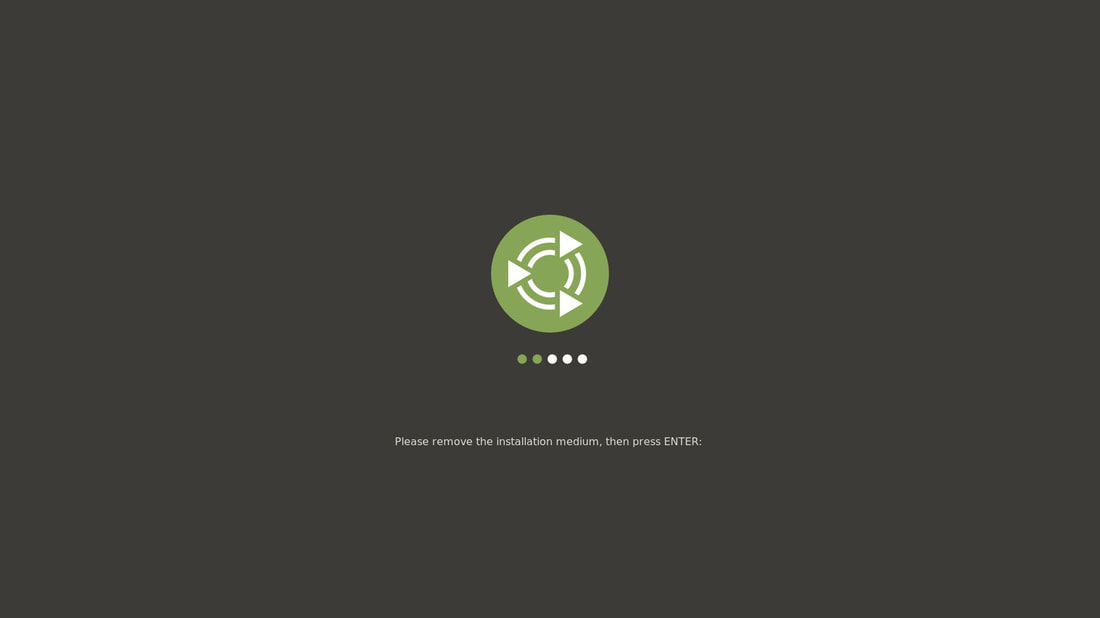
You will be prompted to remove your installation medium from your DVD or USB drive and then press the Enter key to continue.
Picture
After your computer reboots or restarts, you'll see your Ubuntu MATE for the first time.
Picture
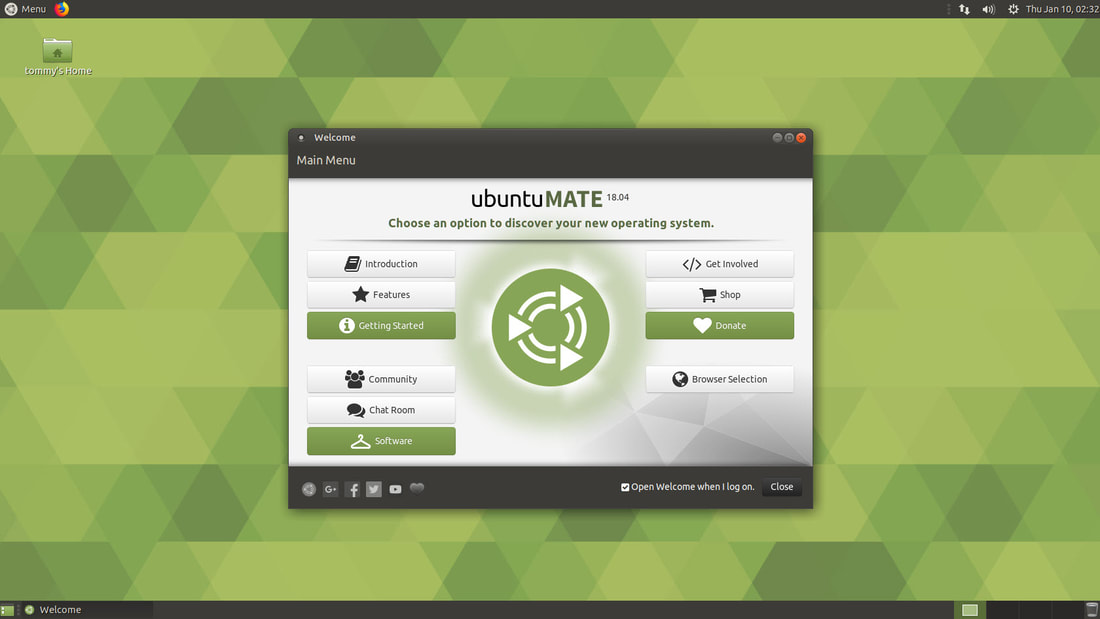
I highly recommend that you click the Getting Started button so that it will guide you through the process of installing additional drivers for your device. It will help you install additional audio and video codecs that will allow you to listen and watch a wide variety of multimedia files. It will help you get updates for your system and software. It will make setting up your system an easy process to do.

I recommend that you install Ubuntu MATE if you are looking for a different operating system. I think you will enjoy its stability and user friendly layout. You will grow to like the way you can customize it to fit your computing needs.

I hope this helped you install Ubuntu MATE on your system.

Take care!


Picture


Simple How-To's | Home | Utility Software
Powered by Create your own unique website with customizable templates.
  • Home
    • Screen Tearing on Intel Graphics
    • Screen Tearing on AMD Graphics
    • How to install Realtek WiFi Driver >
      • How to install Realtek WiFi Driver (Pt 2)
    • Authentication is Required to Mount
    • Traditional Menu
    • Software >
      • App Grid
      • AppCenter
      • GNOME Software
      • Modern Apps
    • Welcome & Software Boutique
    • Remove Welcome & Software Boutique
    • TeamViewer
    • Simple How to Tips >
      • Change Wallpaper
      • Pin a Program
      • Change Date & Time
      • Enable Screensavers >
        • Cosmos Screensaver
      • Decrese Icon Padding
      • Enable Magnification
      • Fading Windows
      • Replace Clock Indicator
      • Remove Media Players
      • Create a Submenu
      • Remove the Collection Menu
      • Preferred Applications
      • Upgrade LibreOffice
      • Install Fonts >
        • Install New Fonts
      • Play a DVD
      • Enable Livepatch
      • Update Software
      • Unresponsive Program
      • Install HWE >
        • Install HWE 20.04
      • Open HEIC Images
      • Open WebP Images
      • USB Flash Drive
      • No Audio
      • Screen Flickering
      • Screen Blanking
      • Draining Battery
      • Reduce Shutdown Time
      • Create a Mount Point
      • Thunderbird Emoticons
      • Sound Preview
      • Failed To Download >
        • Failed to Download (#2)
      • Enter Password to Unlock
      • Two Wifi Icons
      • System Program Problem
      • CD Burner Issue
      • Firefox Homepage Fix
      • VLC Closes Fix
      • Desktop Error
      • Trash Bin
      • MATE Weather Applet
      • OpenGL: renderer: llvmpipe
      • PolicyKit vulnerability
    • Install Ubuntu MATE >
      • Burn an ISO to DVD
      • Create a Bootable USB
      • Upgrade Ubuntu MATE
  • Ubuntu MATE
    • How to Scan
    • How to Take a Screenshot
    • How to View a PDF File
    • Multiple Workspaces
    • Software Updater
    • Archive Manager
    • How to Burn CD/DVDs
    • Setup & Use Email >
      • Email Filter
    • Firefox Web Browser
    • Shotwell Photo Manager
    • Image Viewer
    • Caja File Manager
    • Trash
    • Play Videos
  • Additional Software
    • Antivirus >
      • BitDefender Antivirus
      • ClamTK Antivirus >
        • Clamscan Antivirus
        • ClamTK Caja Add-on
      • Comodo AntiVirus
    • Archive Managers >
      • Archive Manager
      • Ark
      • B1 Free Archiver
      • P7Zip-Desktop
      • PeaZip
      • Xarchiver
    • Browsers >
      • Brave
      • Chrome
      • Chromium
      • Falkon
      • Firefox
      • GNOME Web
      • Iridium Browser
      • LibreWolf
      • Microsoft Edge
      • Midori
      • Min Browser
      • NAVER Whale
      • Opera
      • Otter
      • Pale Moon
      • SeaMonkey
      • Sidekick
      • Slimjet Browser
      • SRWare Iron
      • Ungoogled Chromium
      • Vivaldi
      • Waterfox
      • Yandex Browser
    • Office Applications >
      • Couturier
      • PDF-Shuffler
      • PDF Studio Viewer
      • Xournal
      • Foxit Reader
      • Okular
      • gLabels >
        • Multiple Name Badges
        • CD & DVD Labels
        • Business Cards
        • Mailing Address Labels
        • Return Address Labels
      • Spice-Up
      • Stickynotes
    • Educational Programs >
      • Galculator
      • GeoGebra Classic
      • GNOME Calculator
      • KCalc
      • NumWorks
      • Pebbles
      • Qalculate!
      • QT-Calculator
      • How To Install R >
        • Install R Commander
        • Install RStudio
      • SpeedCrunch
      • TI-83 Plus
      • TI-84 Plus CE
      • KWordQuiz
      • Granule
    • Graphics >
      • 4K Slideshow Maker
      • Imagination
      • Gnome Screenshot
      • Ksnip
      • Shutter >
        • Shutter 0.94.3
      • PhotoFlare
      • Pinta >
        • Tool Palette >
          • Tool Palette (Cont)
        • File Menu >
          • Screenshot Tool
        • View Menu
        • Edit Menu >
          • Palette
        • Image Menu >
          • Image Size
        • Layers Menu
        • Adjustments Menu
        • Effects Menu >
          • Red Eye Removal
          • Pixelate
        • Add-ins Menu
        • Window Menu
        • Help Menu
        • Restore Layout
        • Pinta 1.7
        • Pinta 2.0.1
      • Bing Wallpapers
      • Variety Wallpaper
      • Converseen
      • Curtail
      • Imagine
      • ​Annotator
      • Aliza MS
      • Brightness Controller
      • Photoprint
      • Peek
    • Image Viewers >
      • Deepin Image Viewer
      • Eye of Gnome
      • Fotoxx
      • Geeqie
      • GPicView
      • gThumb
      • Gwenview
      • Mirage
      • nomacs
      • PhotoQt
      • Phototonic
      • Pix
      • Qimgv
      • qView
      • Ristretto
      • Viewnior 1.6 >
        • Viewnior 1.7
      • XnView MP
      • Xviewer
    • Music Players >
      • Amarok
      • Audacious
      • Clementine
      • DeaDBeeF
      • foobar2000
      • Guayadeque
      • Lollypop
      • Museeks
      • Noise Music Player
      • Pragha
      • Quod Libet
      • Rhythmbox
      • Sayonara
      • Strawberry
      • Violin
    • Networking >
      • Dukto
      • LAN-Share
      • Nitroshare
      • Warpinator
    • Utility Software >
      • BleachBit
      • Stacer
      • Ubuntu Cleaner
      • CPU-G
      • CPU-X
      • Hardinfo
      • I-Nex
      • Caffeine
      • Conky >
        • Widgets & Themes
        • Title Bars
      • deb-get
      • GNOME Split
      • GParted
      • GtkOrphan
      • Ice SSB >
        • MS Office Online
        • Pixlr Editor
        • Photopea
      • KRename
      • KShutdown
      • Magnus
      • Radeon Profile
      • Ubuntu Mainline Kernel Installer
      • Y PPA Manager
    • Sound & Video >
      • Avidemux >
        • Merge Videos
        • Cut Videos
        • Crop Videos
      • Selene
      • Radio Tray >
        • Radio Tray Lite
      • Pithos
      • Spotify
      • Asunder
      • EasyTag
      • SimpleScreenRecorder
      • OBS Studio
      • FF Multi Converter
      • FFmpeg
      • SoundConverter
      • MediaInfo
      • Bomi
      • Gnome MPV
      • MPlayer
      • SMPlayer
      • VLC Media Player
      • HandBrake >
        • Convert A Video
    • Entertainment >
      • Hypnotix
      • IPTVnator
      • Airy TV
      • Crackle
      • Plex Live TV
      • Pluto TV
      • Popcornflix
      • Stirr TV
      • Tubi TV
      • Xumo TV
      • YouTube Movies
      • Plex Media Server
      • Emby Media Server
    • Themes & Colors >
      • Themes
      • Installing Themes
      • Customize Themes #1
      • Customize Themes #2
      • Change App Icons
  • Reviews
    • YouTube Reviews >
      • Ubuntu MATE 16.10
      • Ubuntu Mate 17.04
      • Ubuntu MATE 17.10
      • Ubuntu MATE 18.04
      • Ubuntu MATE 20.04
      • Ubuntu MATE 22.04
  • Info
    • How Safe are Your Paasswords >
      • Cyber Security Leaks
      • Hotmail Leak
      • YaHoo Leak
      • Windstream Hacked
    • Windows 7
    • Wireless USB Adapters
  • About
    • In Memory of ...