
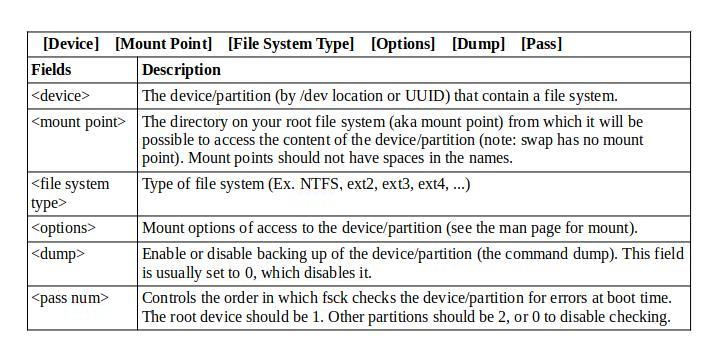
How-To Create a Mount Point
A mount point is simply a directory, like any other, that is created as part of the root filesystem. All partitions in your system are attached via a mount point. The mount point defines where to find the data or files on the hard drives in your system. Usually, you can find your partitions found connected through the root partition. The root directory or folder is indicated with the slash (/) is where your directories are created. Normally, the empty directories on your system are a starting point of the partitions are attached to them.
If you have more than one than one hard drive inside your system and you install Plex, Emby, and/or Jellyfin Media Server(s) then you may need to create a mount point in order to locate your media files (TV shows & movies). I have faced this issue using Ubuntu MATE 18.04 LTS & Ubuntu MATE 20.04 LTS. I have my media files on a 2 TB Hard Disk that was once in an old MS Windows machine. The hard drive was previously formatted with the NTFS file system. My old computer has a total of four hard drives inside it. The four hard drives are:
1. 250 GB Samsung SSD (Contains my Ubuntu MATE 20.04.2 LTS Operating System)
2. 1.5 TB Western Digital (Contains files that have accumulated over the years)
3. 4.0 TB Seagate (Contains files that have accumulated over the years)
4. 2.0 TB Seagate (Contains my TV Shows & Movies and files that have accumulated over the years)
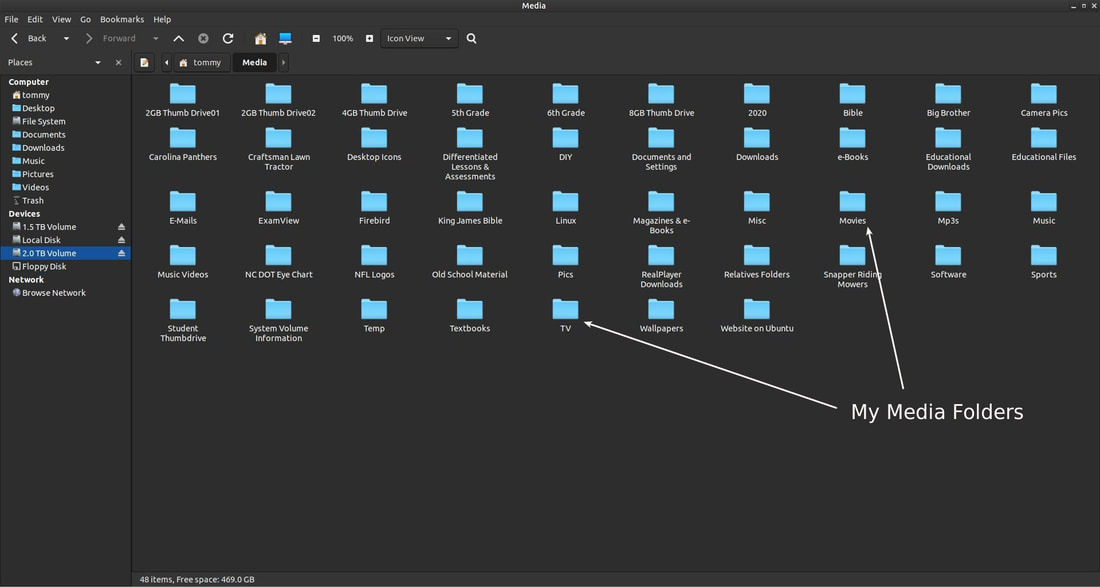
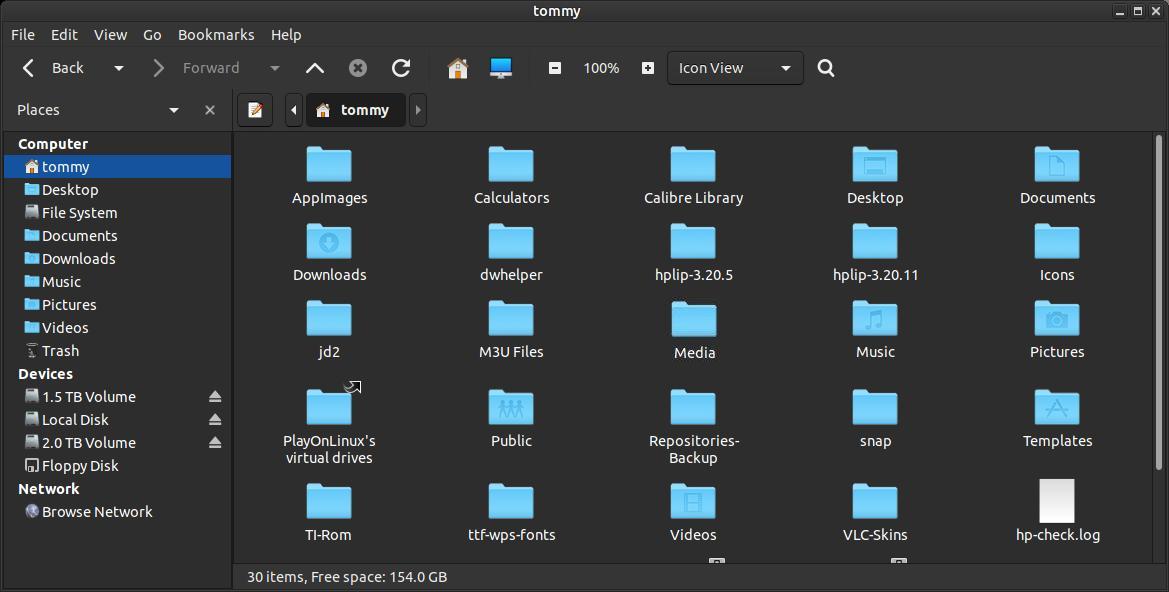
My media files (movies & TV Shows) are located on the 2.0 TB Seagate Hard Drive. As you can see in the image below that I have selected the 2.0 TB Volume drive on the left of the Caja File Manager and it contains the Movies & TV folders. The Movies folder contains all my movie files and the TV folder contains my TV Shows.
1. 250 GB Samsung SSD (Contains my Ubuntu MATE 20.04.2 LTS Operating System)
2. 1.5 TB Western Digital (Contains files that have accumulated over the years)
3. 4.0 TB Seagate (Contains files that have accumulated over the years)
4. 2.0 TB Seagate (Contains my TV Shows & Movies and files that have accumulated over the years)
My media files (movies & TV Shows) are located on the 2.0 TB Seagate Hard Drive. As you can see in the image below that I have selected the 2.0 TB Volume drive on the left of the Caja File Manager and it contains the Movies & TV folders. The Movies folder contains all my movie files and the TV folder contains my TV Shows.
When I installed Plex, Emby, and Jellyfin Media Servers, I was unable to locate those folders on the 2.0 TB Seagate Hard Drive. Therefore, my TV Shows and movies wouldn't show up in each of the programs. I knew the problem wasn't in the programs, so I researched online and discovered that I needed to create a mount point that will allow these programs to see the TV and Movies folder. In order to fix this issue I had to modify or edit the fstab file. The fstab or file systems table file is a system configuration file commonly found in the /etc/fstab folder on a Linux system.
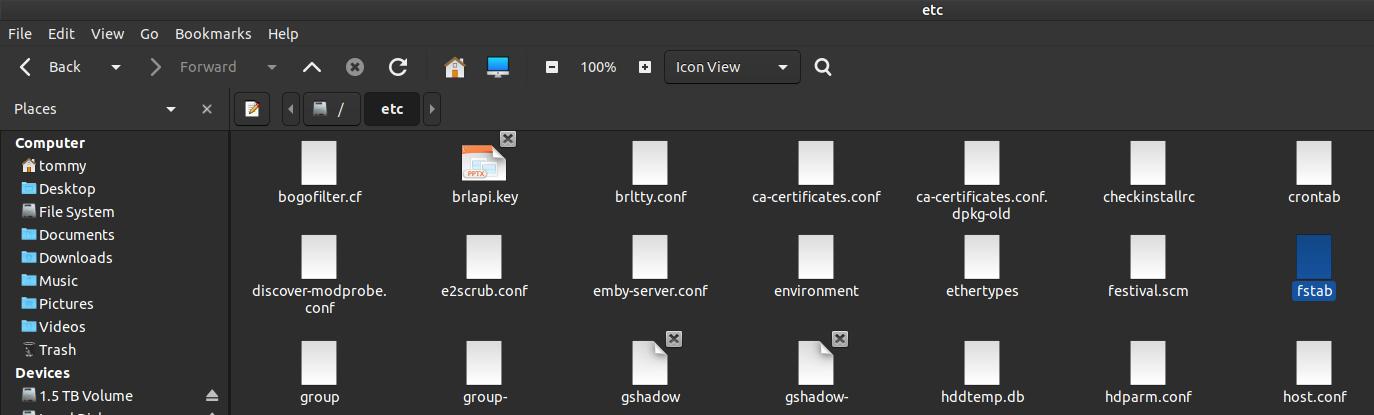
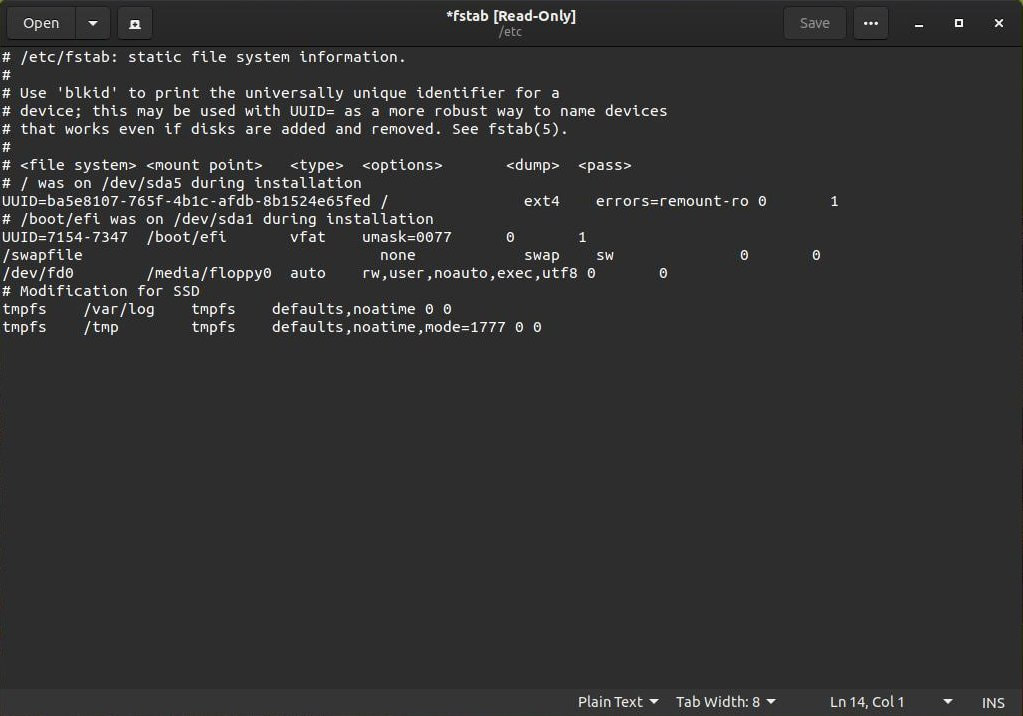
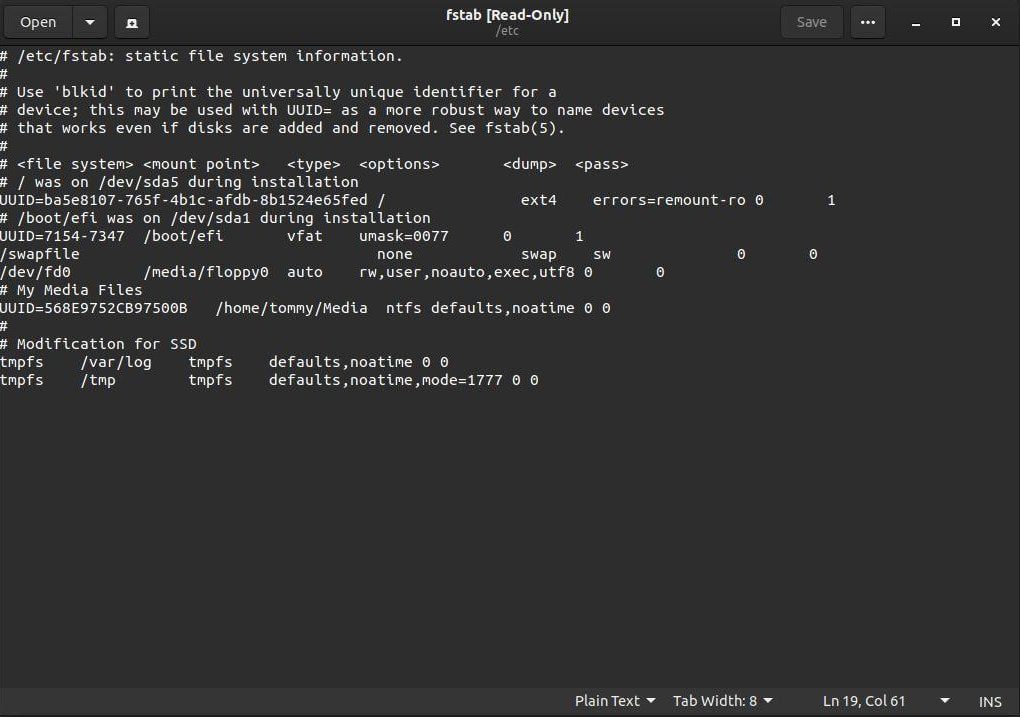
If you double-click the fstab file it will open in your default text editor in Read-Only mode. You can't change or alter the file in Read-Only mode, but you can look at the contents that make-up the file. Lines that start with the # symbol are comments and they are used both as documentation and as a way to "disable" the setting. If you look inside my fstab file you will see the entry UUID=ba5e8107-765f-4b1c-afdb-8b1524e65fed instead of a drive letter. Such entries are called Universally Unique IDentifiers (UUID). The UUID is a 128-bit number used to identify information in computer systems.
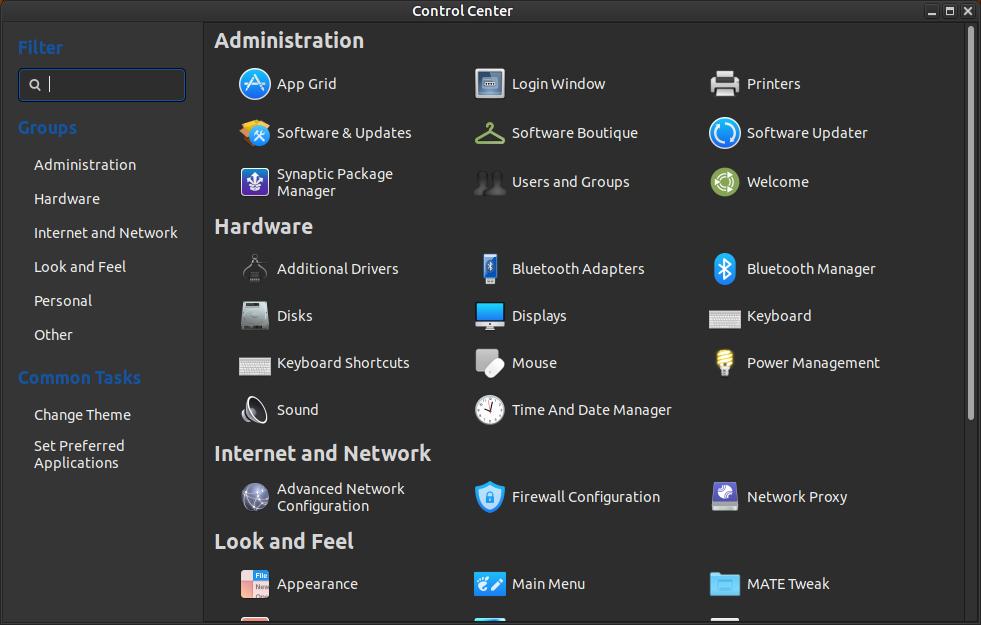
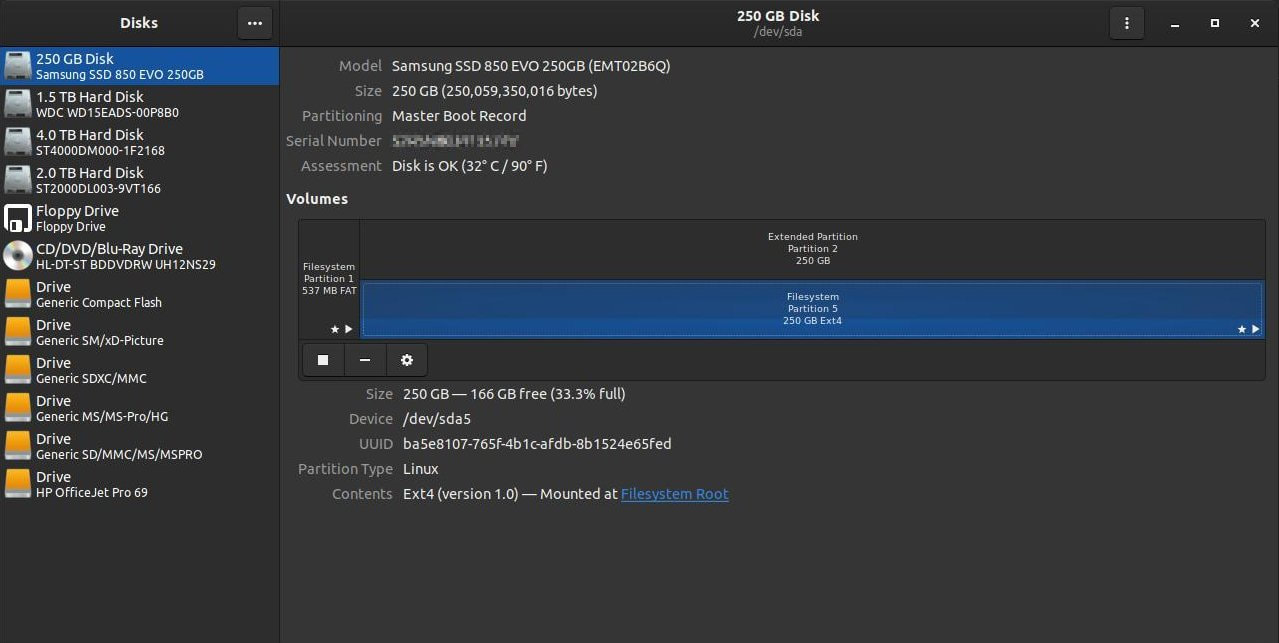
You can use Disks to find the UUID of each hard drive in your system. You can locate Disks in your Control Center. It can be found within the Hardware section or group. Click on Disks to open it.
When Disks opens you'll see the hard drives inside your system located on the left side. The first four items on the left are the hard drives in my system. You can click on each drive icon to collect the information about each drive. You'll notice that Disks will provide you with the hard drive Model, Size, Partitioning, Serial Number, and Assessment. Select a partition section under the Volumes section to collect information about it as well. Below the selected partition you'll find its Size, Device, UUID, Partition Type, and Contents. The selected hard drive in the image below is the 250 GB Samsung SSD that contains my Ubuntu MATE 20.04.2 LTS Operating System. As you can see the UUID below matches the UUID in the fstab file. They both contain UUID=ba5e8107-765f-4b1c-afdb-8b1524e65fed. This means that my 250 GB Samsung SSD will be mounted during the boot-up phase.
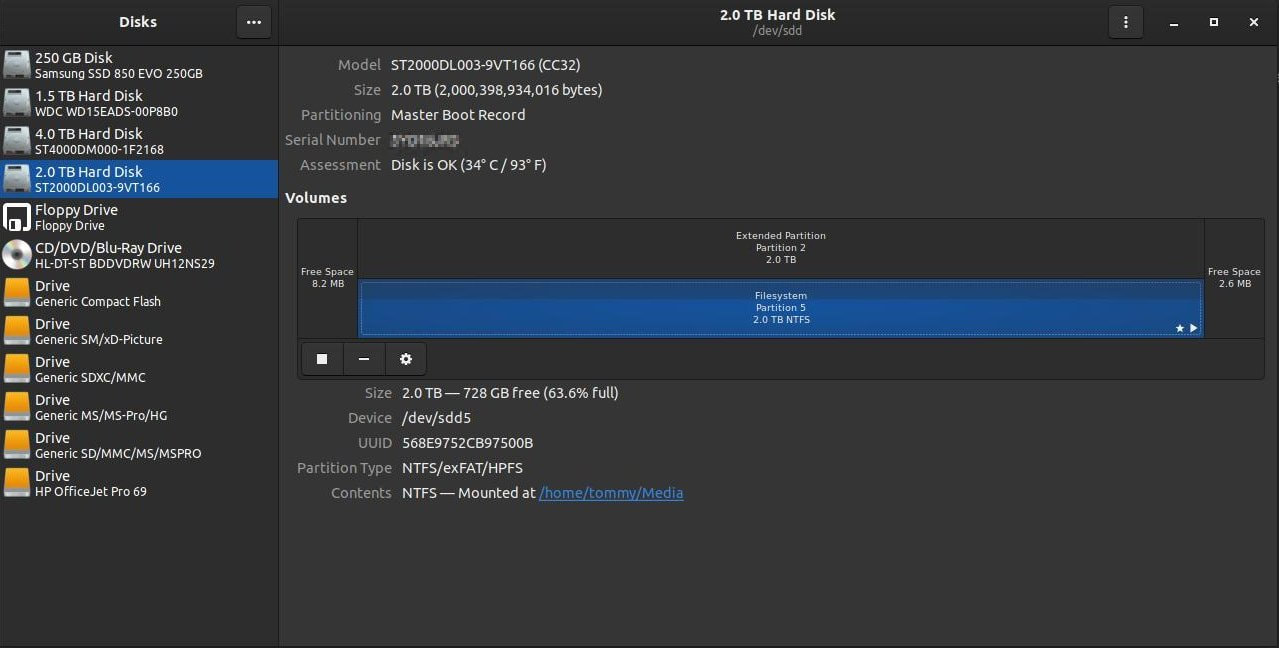
Since my TV and Movies folder are located on my 2.0 TB Hard Disk, I will click on it to get the information I need to add to my fstab. As you can see in the image below that my selected hard drive has a UUID=568E9752CB97500B and a Partition Type of NTFS. This is important information that needs to be remembered for later use.
Next, open your file manager and select your Home folder on the left. Now create an empty folder that will be used as your mount point. I created a folder called Media. Remember exactly how you spelled the folder and the case of each letter (upper case or lower case for each alphabet) because it is case sensitive. I use the Caja File Manager so I right-clicked in an open area to create a pop-up menu and then I selected the Create Folder option. I then typed in the name Media and pressed the Enter key.
Before we add our new information lets first understand what the data means that we will be adding. I first want to add a comment to remind myself in the future what the information is for. Next, I want to add my UUID and number. Then press space a few times or press the Tab key. Then I want to type in the path to my mount point. Then press space a few times or press the Tab key. Then I want to type in my file system type. Since this hard drive was formatted and used in an old MS Windows machine the file type is ntfs. Then press space a few times or press the Tab key. Then I want to enter defaults,noatime for my options. (To help you understand the different options check out the man page for mount.) Then press space a few times or press the Tab key. I then enter 0 for the dump to disable backing up the partition. Then press space a few times or press the Tab key. I then enter 0 for the pass number to disable checking for errors during boot time.
# My Media Files
UUID=568E9752CB97500B /home/tommy/Media ntfs defaults,noatime 0 0
# My Media Files
UUID=568E9752CB97500B /home/tommy/Media ntfs defaults,noatime 0 0
Fstab File Configuration
*** CAUTION - Entering the wrong information in your fstab can prevent your system from booting up properly. ***
I highly recommend that you make a backup copy of your fstab before you make any changes to it. To make a backup copy of the fstab file, open your Terminal and enter the following: sudo cp /etc/fstab /etc/fstab.bak If something does go wrong and you're able to boot into your Terminal, you can enter the following to restore your original file: sudo cp /etc/fstab.bak /etc/fstab
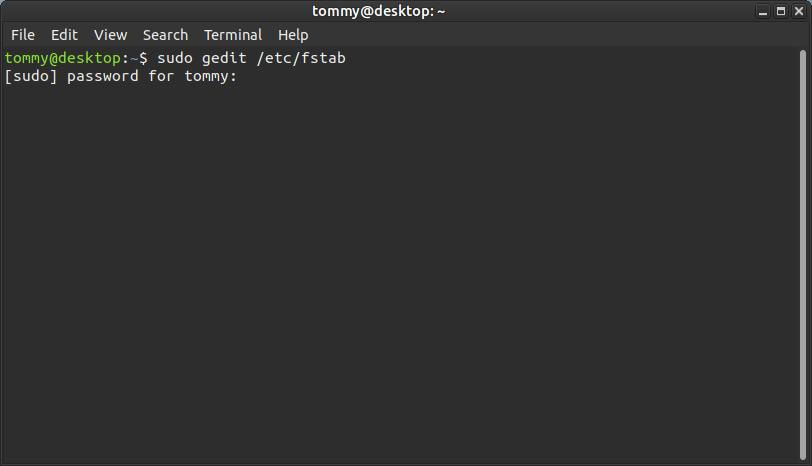
Now I am ready to modify or edit my fstab file. You can edit the file using any text editor. My favorite text editor is gedit. (You can install gedit on your system by opening the Terminal and entering the following: sudo apt-get install gedit). You must superuser or root user before editing fstab, so in order to edit the file you must use the sudo command.
Editing the FSTAB File
Open your Terminal and enter the following: sudo gedit /etc/fstab (Replace gedit with your favorite text editor.) Enter your password and press Enter.
Open your Terminal and enter the following: sudo gedit /etc/fstab (Replace gedit with your favorite text editor.) Enter your password and press Enter.
You should now see something like my fstab image below. (I had edited my fstab file a while back and added the last three lines. This was to speed up my SSD by including noatime command. You can learn more about noatime at opensource.com.)
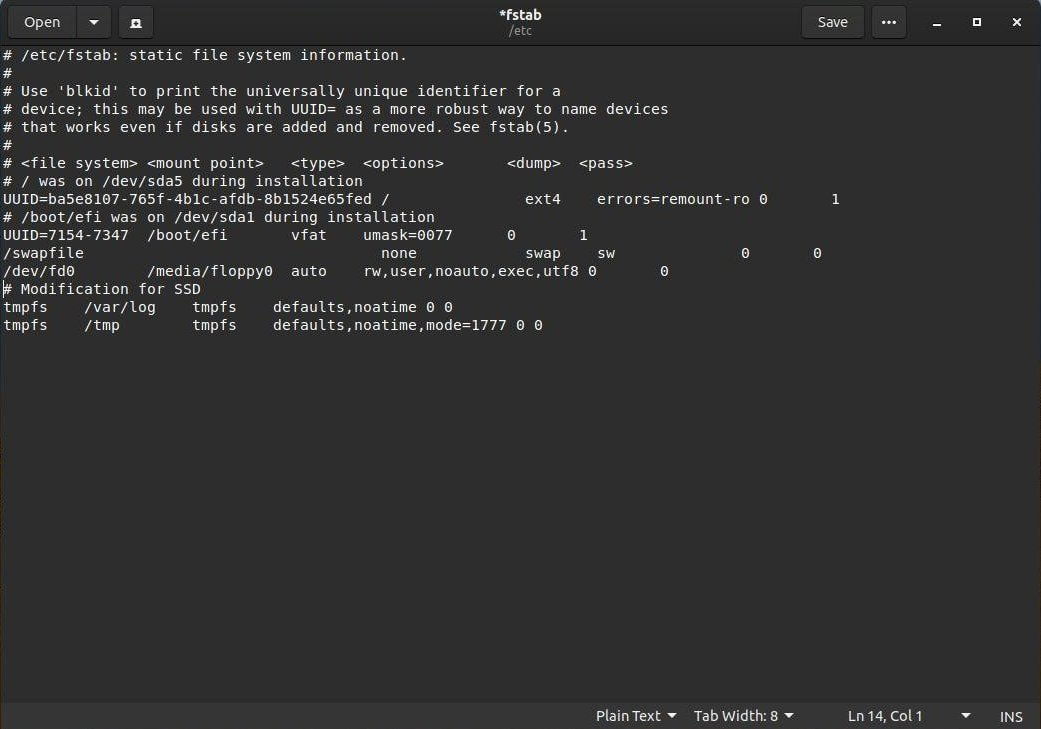
I want to put my information before # Modification for SSD, so I placed my insertion point before the # symbol and pressed Enter. Now I enter the following information into that location. I recommend that you have the information in a text file and copy and paste it into the fstab file. Keep in mind that the information you enter is case sensitive. I created a Media folder using a upper case M so I must use an upper case M within the mount point path.
# My Media Files
UUID=568E9752CB97500B /home/tommy/Media ntfs defaults,noatime 0 0
Press the Save button within gedit to save the additional information. You can now safely close gedit or your text editor.
# My Media Files
UUID=568E9752CB97500B /home/tommy/Media ntfs defaults,noatime 0 0
Press the Save button within gedit to save the additional information. You can now safely close gedit or your text editor.
Before we reboot the system, we need to test if the additional information added to the fstab file will create any errors. Open your Terminal and enter the following: sudo mount -a Type in your password and press the Enter key. If you typed something wrong in fstab then an error message should appear.

Now exit the Terminal and reboot your system. Then open your file manager and look at the folder icon you created earlier. My Media folder now has a small hard drive icon in the lower right. This means the mount point loaded properly.

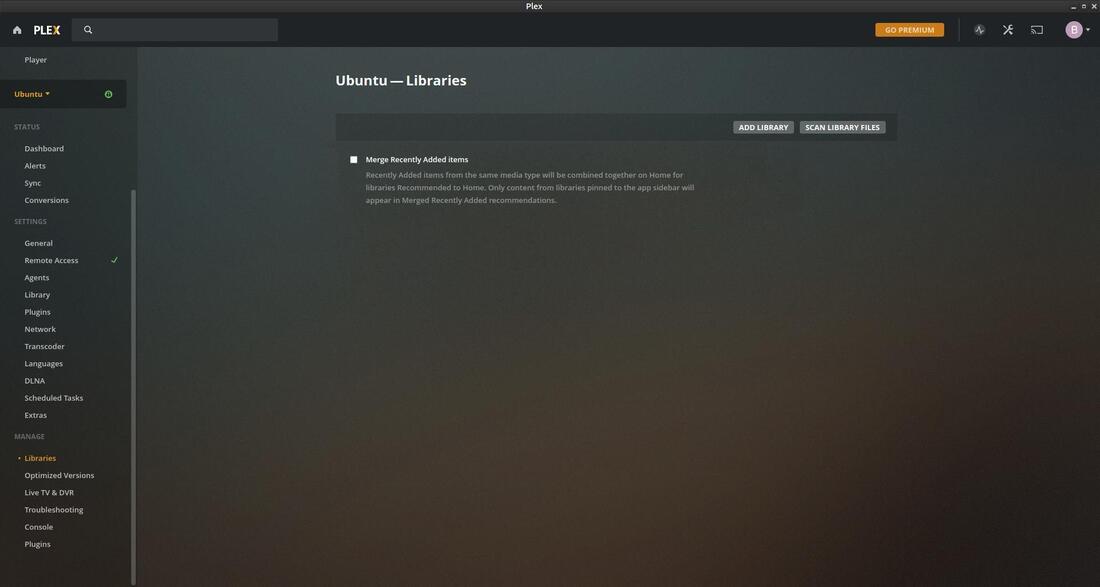
Now Plex, Emby, and Jellyfin Media Servers should be able to have access to you media files such as your recorded TV shows and Movies. I will use Plex in my example to see if it works. Open Plex Media Server and then click on the Settings icon in the upper right corner (tools icon). Now select Liraries under the MANAGE section on the left. Next, click the Add Library button to allow you to find your media files.
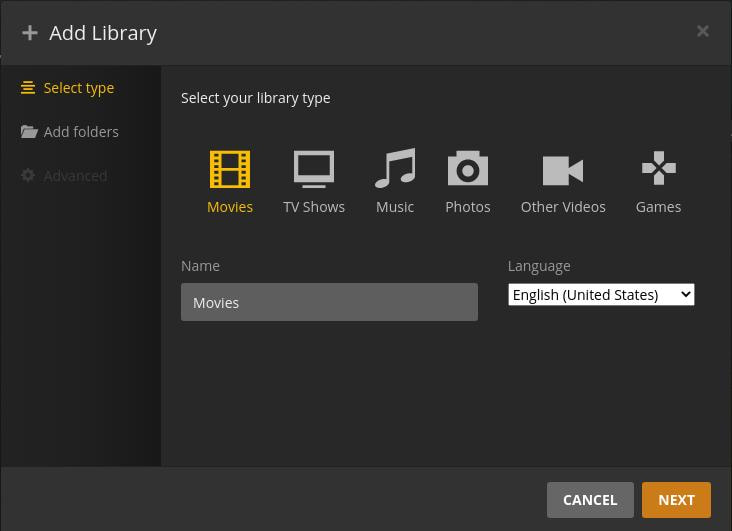
You should now see a + Add Library dialog box. I will start by adding my movies to Plex. Click on the Movies icon and then click Next.

Type the name you want to display on the left hand side of the Plex window. I used Movies as the name of my library type. Click the Next button to continue.
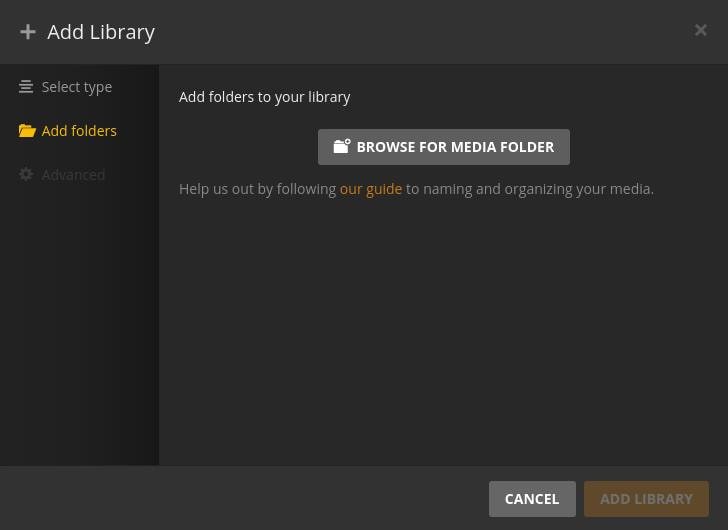
Now click the BROWSE FOR MEDIA FOLDER button. It will open an Add Folder dialog box to allow you to find the Media folder.
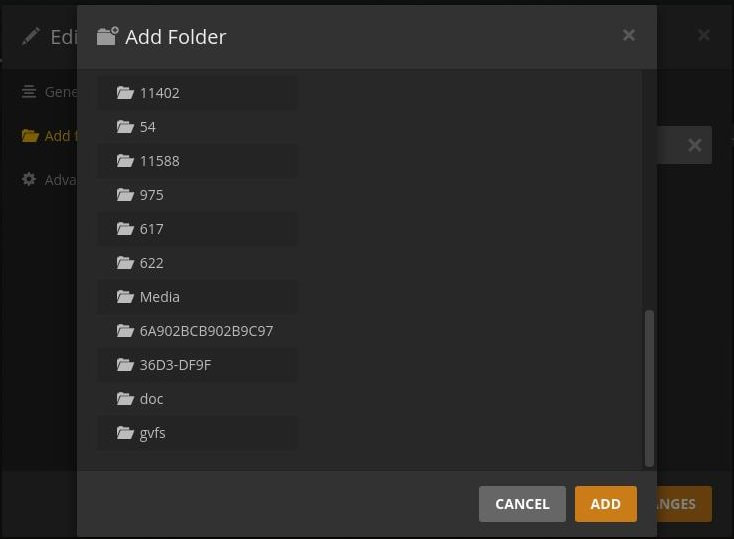
You should now be able to scroll down and locate the Media folder you created and mounted. Now click on the Media folder to display the contents within it.
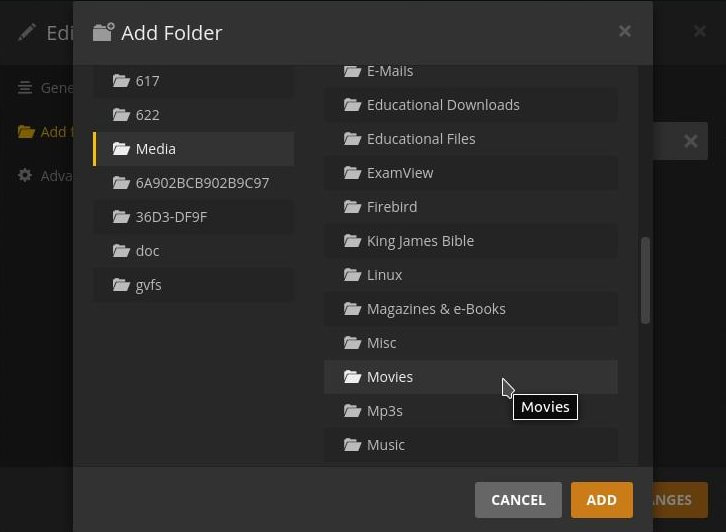
Now you should see the folders and files on the newly mounted hard drive. Scroll down and locate and select the Movies folder and then click the Add button. This will allow Plex to scan the Movies folder and create thumbnails and descriptions for all the movies in that folder and sub-folder. Repeat the same steps for TV shows but select your TV folder.
You should now see 2 libraries added: Movies & TV Shows

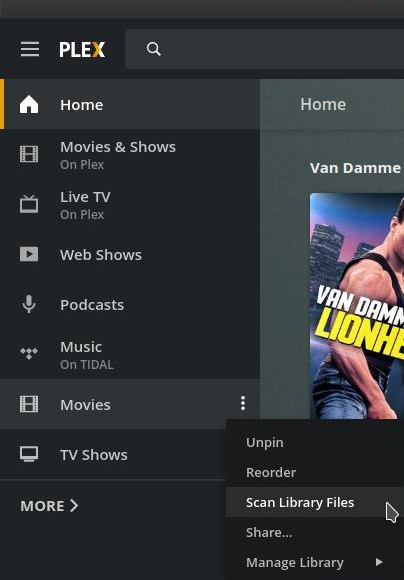
Next, click the Home icon in the upper left corner. Plex should soon start scanning your system to locate all your movies and TV shows in the folders you selected. If it doesn't or you can't wait for the scan process to start, then click the three dots or hamburger menu to the right of Movies and click on Scan Library Files.
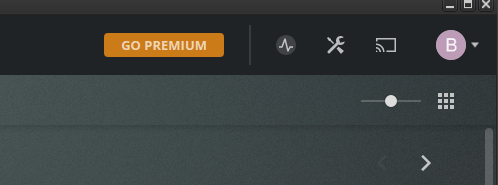
You should see the Activity icon in the upper right corner become animated. When you see this happening, it means Plex is updating its multimedia database. It may take a long time to complete the first initial scan, but it will be a lot faster in future scans.
When the scan completes you should see thumbnails and titles of each of your Movies and TV Shows. This indicates that your mount point was a success.
Now you should be able to access your media files with Plex, Emby, and/or Jellyfin Media Server(s). Your music files can now be accessed using your default music player. Your eBooks should be accessible by your default PDF viewer or Calibre.
Linux is a wonderful operating system. It is highly customizable and can be easily tweaked or modified to do a lot of things. Not everyone that uses Linux needs to modify their fstab file, but the instructions above should help those that do. For more information on the fstab command check out the information on Ubuntu's Documentation.
In my example, I used a hard drive that was partitioned and formated using MS Windows, so it had the NTFS type. You can also use the same steps with a hard drive partitioned and formated using Linux. Just be sure you select the correct type for your hard drive. Below are four examples of hard drives partitioned and formated with Linux. The first two examples used the defaults as the only option. This will work for most users or beginning users of Linux. However, you can refer to the man page for mount for more Filesystem Independent Mount Options that may work for your system. These options are for the intermediate and advanced Linux users. Examples three and four are for the more advanced Linux users.
Example 1:
UUID=a213ed98-641f-4f67-9480-d92a8d7e82f7 /media/Backup ext4 defaults 0 0
Example 2:
UUID=ecf0d80f-f8b3-4893-9a0f-157e8025a960 /media/data ext4 defaults 0 0
Example 3:
UUID=87a8f286-8ce6-4aab-bdab-3ff591d0f023 /home/data1 ext4 defaults,x-gvfs-show 0 0
Example 4:
UUID=120d9ae4-bd49-4c32-a498-1bb2eca1021f /media/Storage1 ext4 rw,nosuid,nodev,relatime,data=ordered 0 0
I hope this has helped someone that needed help creating a mount point.
May 4, 2021
