
ClamTK Antirus for Linux
ClamTk is an open source desktop application that provides users with a graphical front-end (GUI) for the well known Clam AntiVirus virus scanner application that runs on Linux-based operating systems.
ClamTK is an easy to use on-demand Virus Scanner program for Linux. It can be installed on Fedora, Debian, RedHat, openSUSE, ALT Linux, Ubuntu, CentOS, Gentoo, Archlinux, Mandriva, PCLinuxOS, Frugalware, FreeBSD, and others. Since I am currently using Ubuntu MATE 22.04.1 LTS, I will focus on installing using a .deb package. However, if you use any of these other distributions of Linux then you can go to the ClamTK Downloads site (Releases) and download the installation package for your system.
How To Install ClamTK Antivirus for Linux
If you install ClamTK by using the Terminal then you will be using the Ubuntu repositories that will install an older version of the program. This is fine if you're using Ubuntu MATE 16.04 LTS with the MATE Desktop 1.14.1 using the GTK2 Tool Kit. The newer version of Ubuntu MATE supports the GTK3 Tool Kit. so it will require ClamTK 6.01 or newer. At the time of making this webpage, ClamTK 6.18 is the latest version of the program, so that's what I'm going to demonstrate. You can check the GitHub website Releases section to see if there's a newer version.
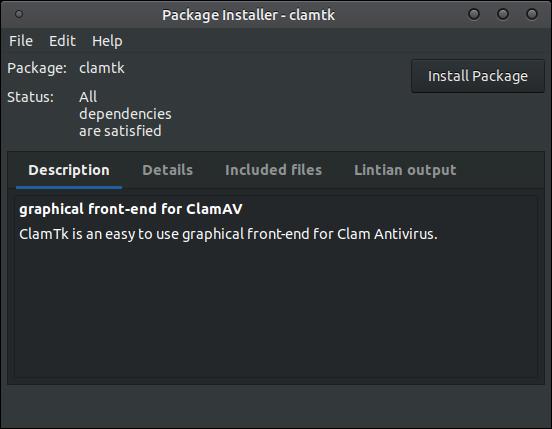
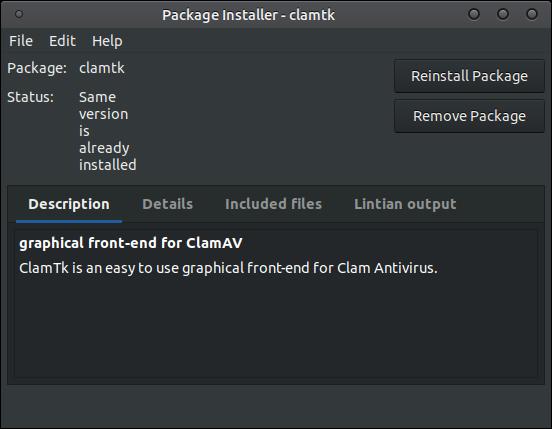
Click on the the filename clamtk_6.18-1_all.deb to download the .deb package for ClamTK 6.18. Then go into your Downloads folder or the location of the file you downloaded and double-click it to open the Package Installer. (You must have gdebi installed. Open your Terminal and enter sudo apt install gdebi) Click the Install Package button to install clamtk_6.18-1_all.deb file.
If you install ClamTK by using the Terminal then you will be using the Ubuntu repositories that will install an older version of the program. This is fine if you're using Ubuntu MATE 16.04 LTS with the MATE Desktop 1.14.1 using the GTK2 Tool Kit. The newer version of Ubuntu MATE supports the GTK3 Tool Kit. so it will require ClamTK 6.01 or newer. At the time of making this webpage, ClamTK 6.18 is the latest version of the program, so that's what I'm going to demonstrate. You can check the GitHub website Releases section to see if there's a newer version.
Click on the the filename clamtk_6.18-1_all.deb to download the .deb package for ClamTK 6.18. Then go into your Downloads folder or the location of the file you downloaded and double-click it to open the Package Installer. (You must have gdebi installed. Open your Terminal and enter sudo apt install gdebi) Click the Install Package button to install clamtk_6.18-1_all.deb file.
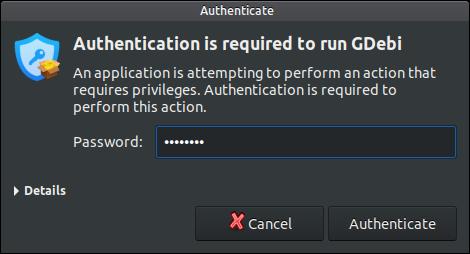
Type in your password and click on the Authenticate button.
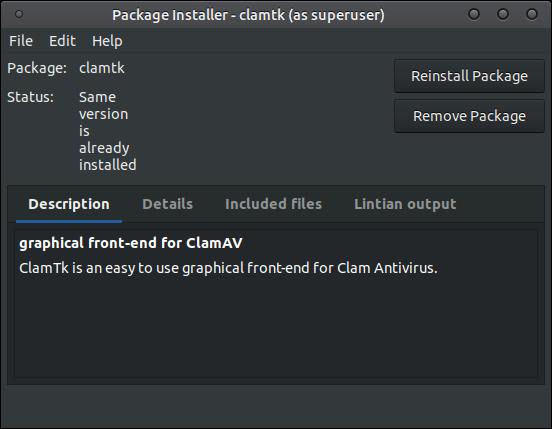
Do not close the Package Installer dialog box until you see "Status: Same version is already installed."
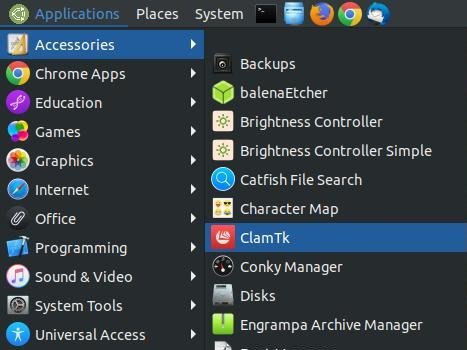
You can start the program via the menu. Highlight the Accessories menu and then click on ClamTK to start the program.
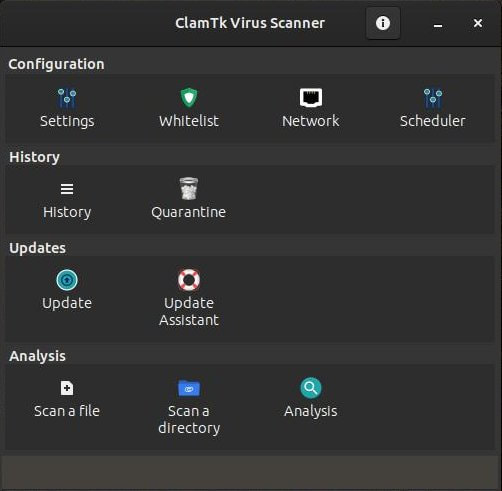
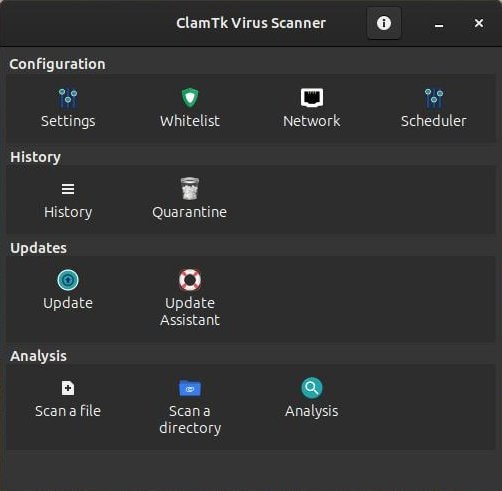
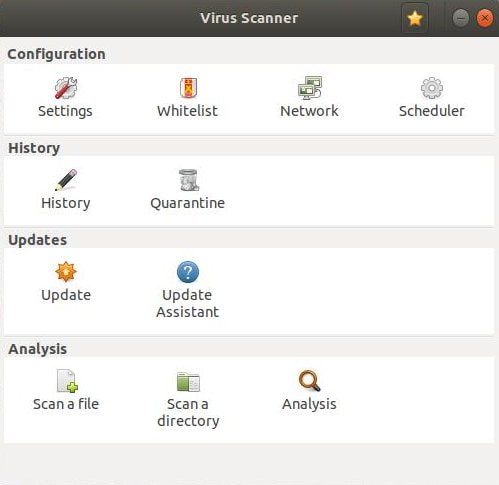
ClamTK will load and you'll see Virus Scanner on the title bar. You will notice the user interface is divided into four sections, Configuration, History, Updates, and Analysis.
Configuration
The Configuration is made up of Settings, Whitelist, Network, and Scheduler.
The Configuration is made up of Settings, Whitelist, Network, and Scheduler.

Settings
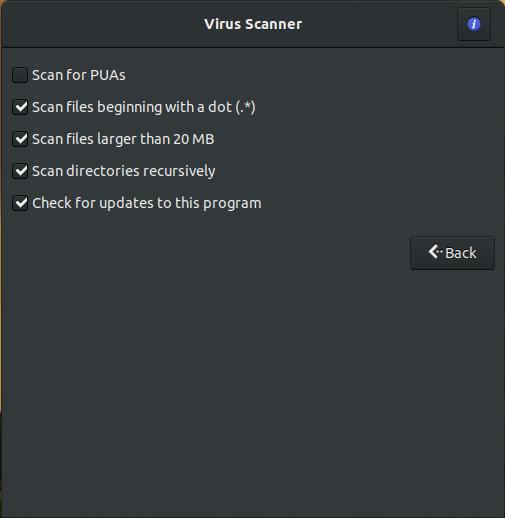
* Settings - You have five options in the settings screen:
- Scan for PUAs (This option enables the ability to scan for Potentially Unwanted Applications.
Creates many false positives.)
- Scan files beginning with a dot (.*) (A dot file or dotfile is treated as hidden file in Linux.)
- Scan files larger than 20 MB
- Scan directories recursively (All the subdirectories in the given directory will be scanned.)
- Check for updates to this program
Whitelist
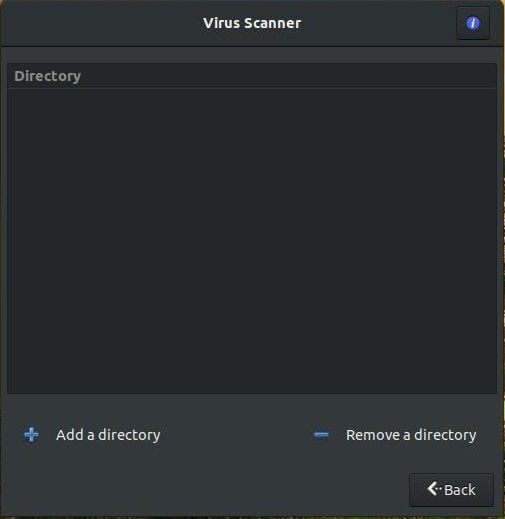
The Whitelist is made up of directories or folders on your system that you identify as safe. The Whitelist option provides the ability to skip specific directories during scan time. For example, you may wish to skip directories containing music or videos. You can click the + Plus symbol to add a directory to your Whitelist or you can select a directory in your list and click the - Minus symbol to remove a directory from your Whitelist. Since I've just recently installed the program, I don't have any directories added to my Whitelist.
The Whitelist is made up of directories or folders on your system that you identify as safe. The Whitelist option provides the ability to skip specific directories during scan time. For example, you may wish to skip directories containing music or videos. You can click the + Plus symbol to add a directory to your Whitelist or you can select a directory in your list and click the - Minus symbol to remove a directory from your Whitelist. Since I've just recently installed the program, I don't have any directories added to my Whitelist.
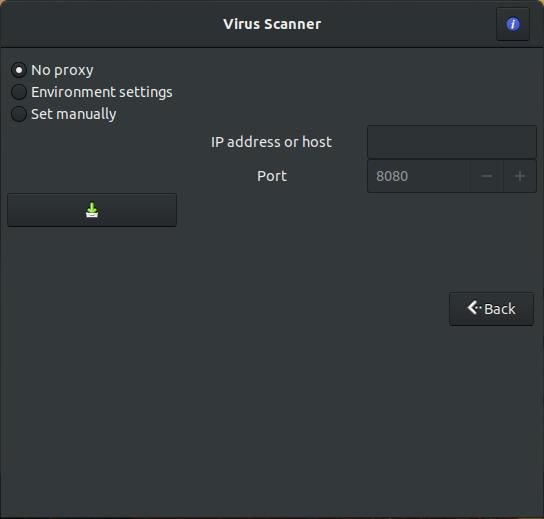
Network
The Network section is used if you require specific proxy settings. Clicking the button on the left will save your settings.
The Network section is used if you require specific proxy settings. Clicking the button on the left will save your settings.
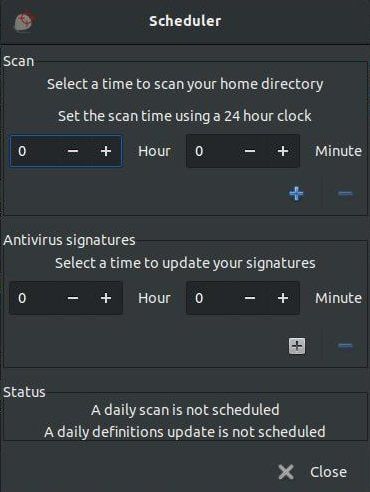
Scheduler
The Scheduler is made up of three sections: Scan, Antivirus signatures, and Status.
- Scan - you can select a time of the day you want the program to scan your Home directory.
- Antivirus signatures - you can select a time during the day to update your antivirus signatures.
- Status - Informs you if you have a time selected to scan your Home directory and/or time selected to
updates your signatures.
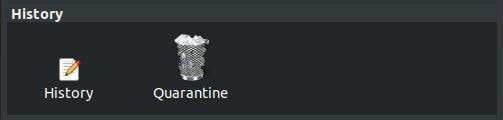
History
The History is made up of History and Quarantine.
The History is made up of History and Quarantine.
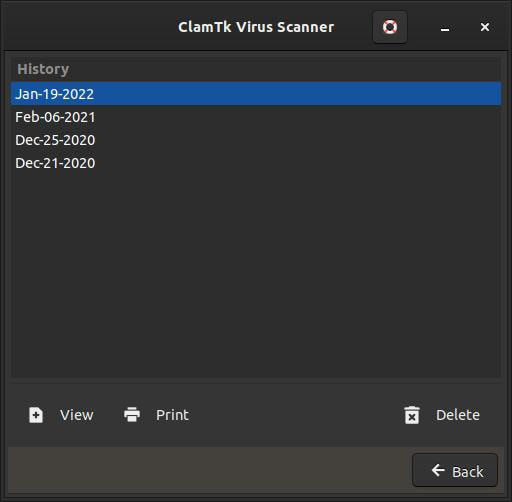
History
The History section allows you to view previous scans.
The History section allows you to view previous scans.
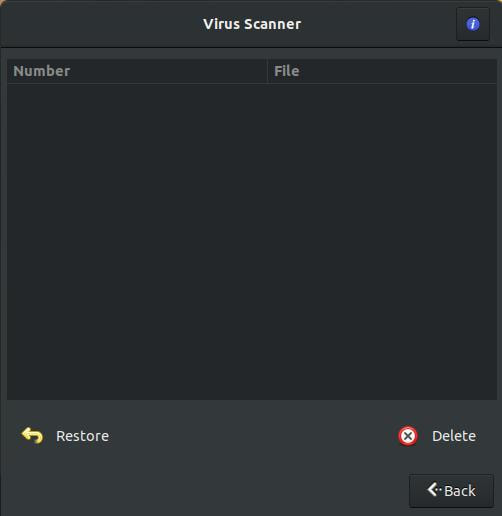
Quarantine
The Quarantine section allows you to view a list of all the potential infected files or threats. You can manage quarantined files through the Quarantine icon. If you see a file in this list and you know that it's not infected then you can click the Restore button to put it back in its original folder.
The Quarantine section allows you to view a list of all the potential infected files or threats. You can manage quarantined files through the Quarantine icon. If you see a file in this list and you know that it's not infected then you can click the Restore button to put it back in its original folder.
Updates
Updates is made up of Update and Update Assistant.
Updates is made up of Update and Update Assistant.
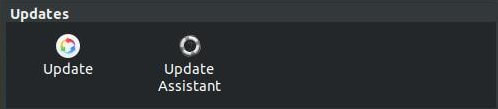
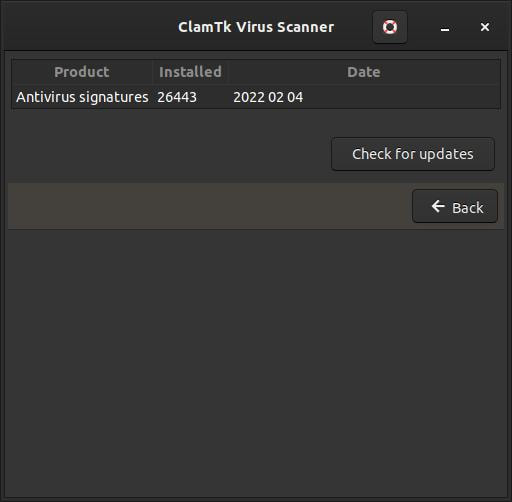
Update
The Update icon will allow you to manually update your Antivirus signatures. Just click the Check for updates button.
The Update icon will allow you to manually update your Antivirus signatures. Just click the Check for updates button.
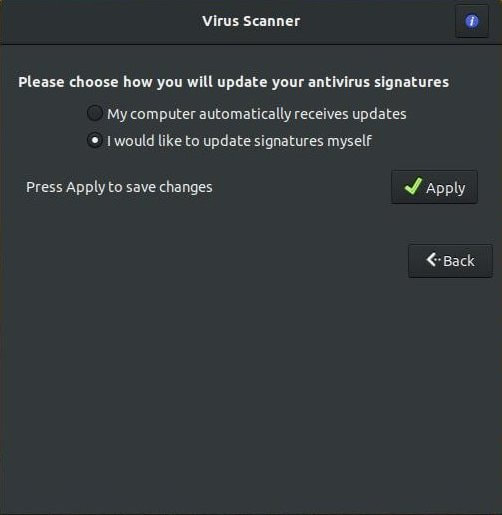
Update Assistant
The Update Assistant icon will allow you to switch between automatically receive updates or manually receive updates.
The Update Assistant icon will allow you to switch between automatically receive updates or manually receive updates.
Analysis
Analysis is made up of Scan a file, Scan a directory, and Analysis.
Analysis is made up of Scan a file, Scan a directory, and Analysis.
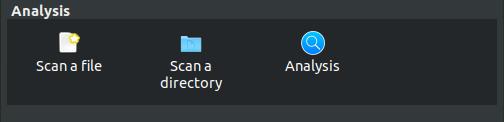
Scan a file
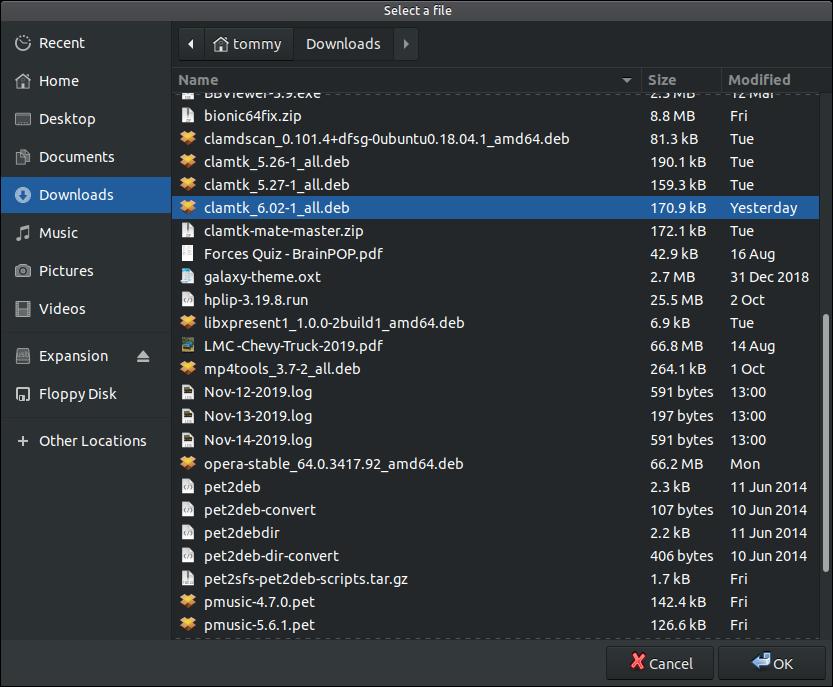
Scan a file icon will allow you to scan an individual file on your system. When you click on the icon a Select a file dialog box will pop-up and allow you to select a file. I selected the installation file and clicked the OK button.
Scan a file icon will allow you to scan an individual file on your system. When you click on the icon a Select a file dialog box will pop-up and allow you to select a file. I selected the installation file and clicked the OK button.
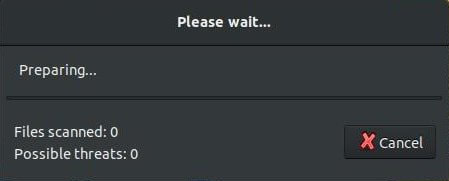
ClamTK will take a while to prepare for the scan. You will see a Please wait... dialog box as you wait for your file to scan.
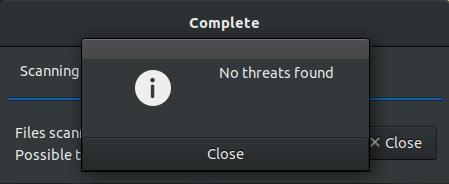
You will eventually see a small dialog box to inform you if your file was infected or not. In my example it said, "No threats found."
Scan a directory
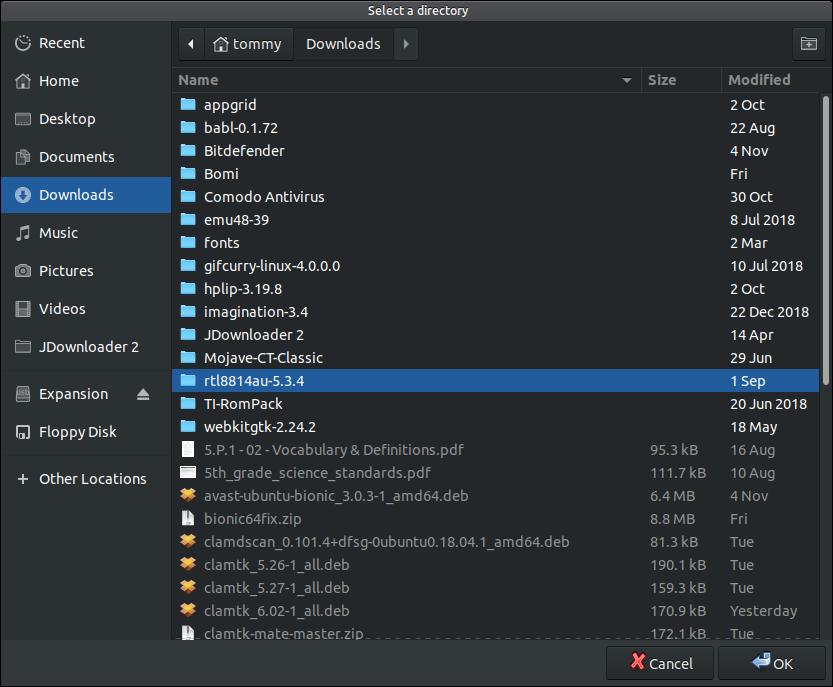
Scan a directory icon will allow you to scan an entire directory or folder on your system. When you click on the icon a Select a directory dialog box will pop-up and allow you to select a directory. I selected the installation file and clicked the OK button.
Scan a directory icon will allow you to scan an entire directory or folder on your system. When you click on the icon a Select a directory dialog box will pop-up and allow you to select a directory. I selected the installation file and clicked the OK button.
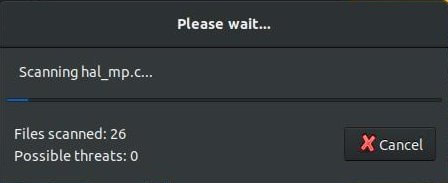
ClamTK will take a while to prepare for the scan. You will see a Please wait... dialog box as you wait for your directory to scan.
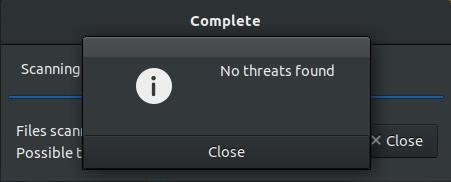
You will eventually see a small dialog box to inform you if your directory had any files that was infected or not. In my example it said, "No threats found."
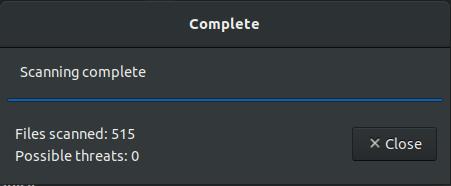
After you close the small dialog box, you'll see the number of files that was scanned in your directory or folder.
Analysis
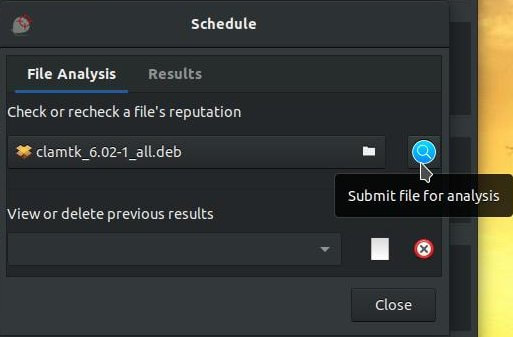
Analysis icon allows you to view a file’s reputation. When you first click the icon you'll see two tabs: File Analysis and Results.
File Analysis is the default tab selected. In this tab you can Check or recheck a file's reputation and View or delete previous results.
Analysis icon allows you to view a file’s reputation. When you first click the icon you'll see two tabs: File Analysis and Results.
File Analysis is the default tab selected. In this tab you can Check or recheck a file's reputation and View or delete previous results.
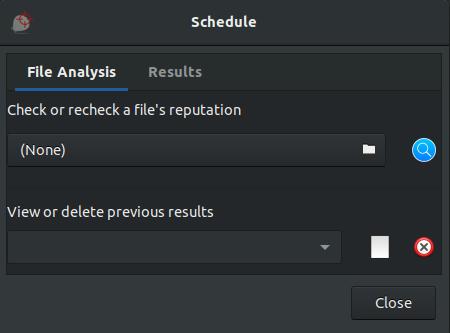
In the upper portion you can select a questionable file from your your computer and submit the file for the company for analysis. In the lower box you can view or delete the results of the files you have submitted.
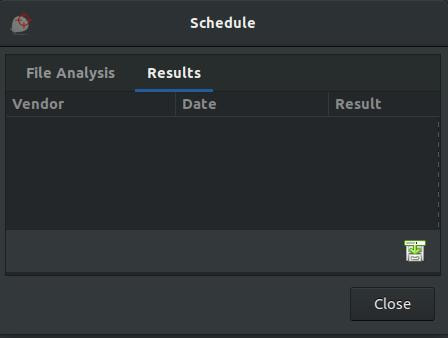
The second tab displays the Results of the infected files.
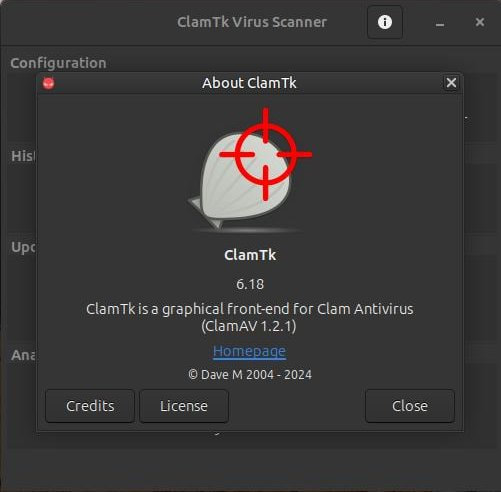
You can click the About icon in the upper right corner to display additional information about the program.
The About ClamTK dialog box will display your version of the program (ver. 6.14), a brief description of the program, a link to the Homepage->Downloads webpage of the program, the creators name, Credits button, License button, and Close button.
Plugins
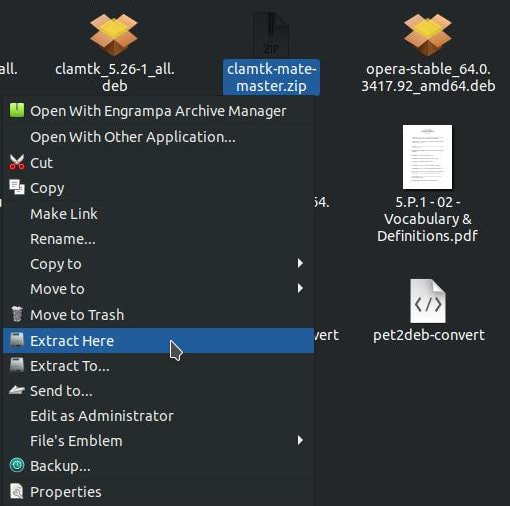
To add a right-click, context menu ability to send files and directories to the scanner, install the appropriate plugin. If you are using Ubuntu MATE follow these instructions to integrate the right-click feature in your Caja file manager. Click on the following file to download it to your Downloads folder.
clamtk-mate-master.zip
Go into your Downloads folder and right-click the file and click on the command in the menu Extract Here to unzip the files in the compressed file.
Double-click the new folder called clamtk-mate-master to open it and then right-click into the empty space and click on Open in Terminal.
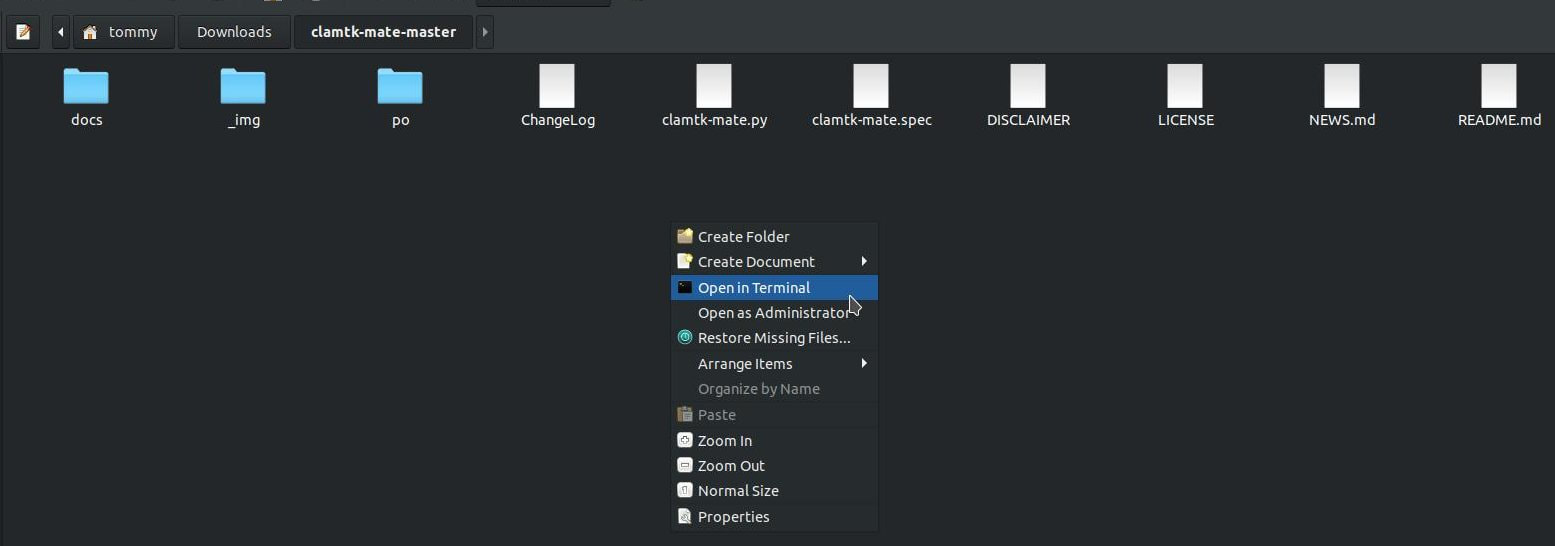
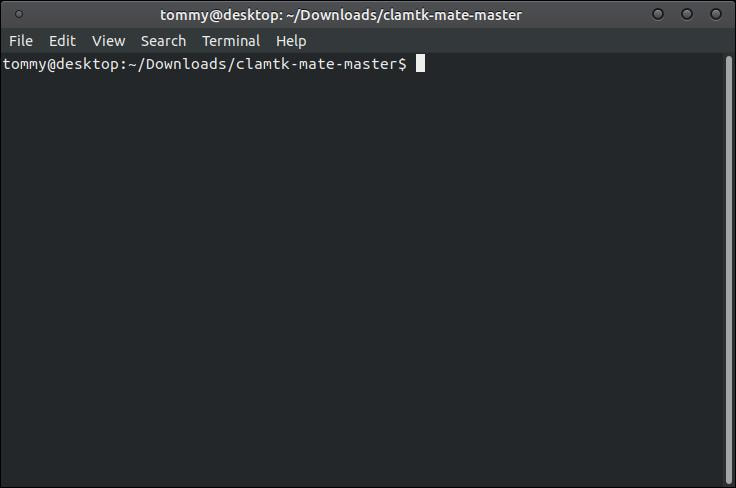
Your Terminal will open and already be in the clamtk-mate-master directory or folder.
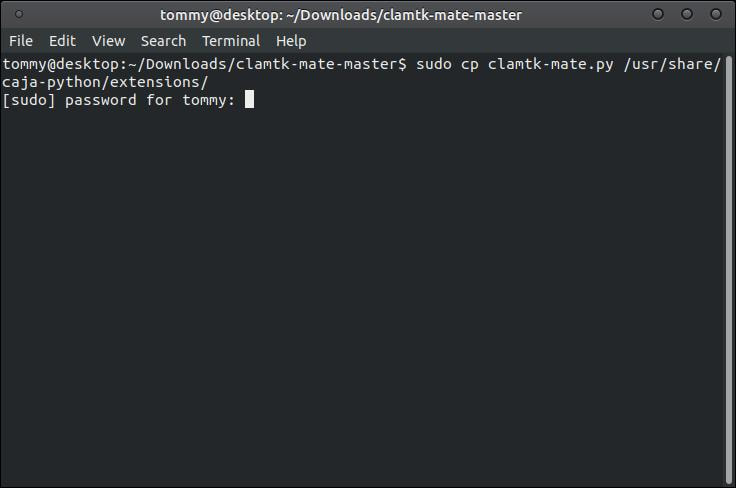
Enter the following command into your Terminal:
sudo cp clamtk-mate.py /usr/share/caja-python/extensions/
Press the Enter key and type in your password.
sudo cp clamtk-mate.py /usr/share/caja-python/extensions/
Press the Enter key and type in your password.
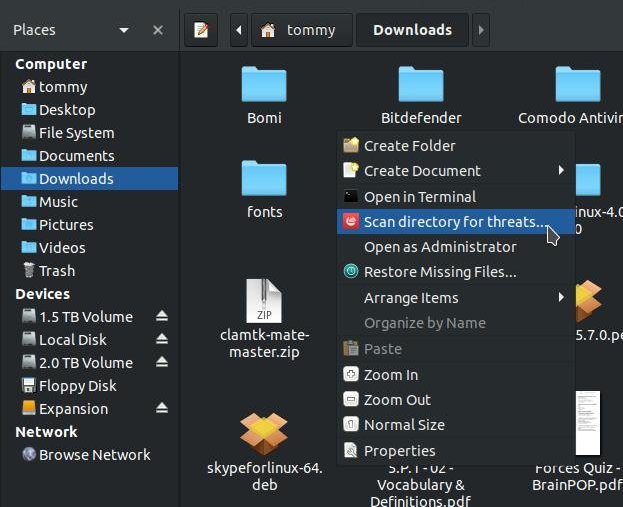
Now Reboot your computer. After your system reboots, you can right-click in an empty area within a directory or folder and select Scan directory for threats... This will scan all the files in that directory or folder.
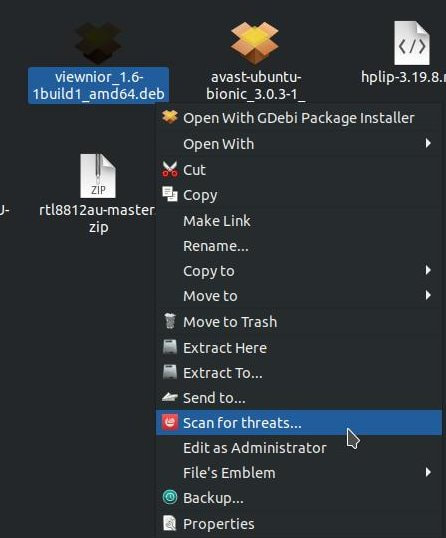
You can also click on a file and then right-click on it and select Scan for threats... to scan the file.
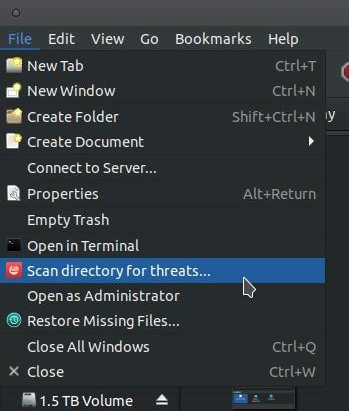
You can also click on a directory or folder and then click the File menu within your Caja file manager and select Scan directory for threats...
Here are the links for plugins for different file managers:
- For Gnome (Files file manager): https://bitbucket.org/davem_/clamtk-gnome/downloads/?tab=downloads
- For KDE (Dolphin file manager): https://bitbucket.org/davem_/clamtk-kde/downloads/?tab=downloads
- For XFCE (Thunar file manager): https://bitbucket.org/davem_/thunar-sendto-clamtk/downloads/?tab=downloads
- For MATE (Nemo file manager): https://bitbucket.org/davem_/nemo-sendto-clamtk/downloads/?tab=downloads
How to Remove ClamTK
Like any other program in Linux, there are multiple ways to remove ClamTK from your system. You can double-click the installation .deb file you used to install the program and click the Remove Package button.
Like any other program in Linux, there are multiple ways to remove ClamTK from your system. You can double-click the installation .deb file you used to install the program and click the Remove Package button.
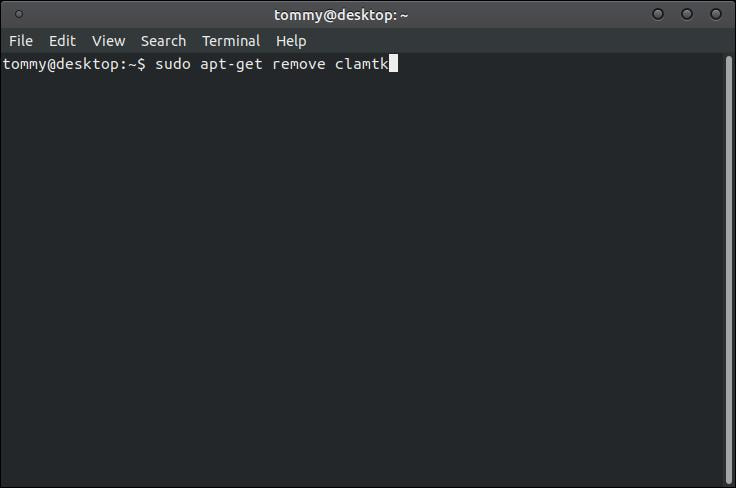
You can open your Terminal and enter the following command:
sudo apt-get remove clamtk
This will remove just the clamtk package itself.
sudo apt-get remove clamtk
This will remove just the clamtk package itself.
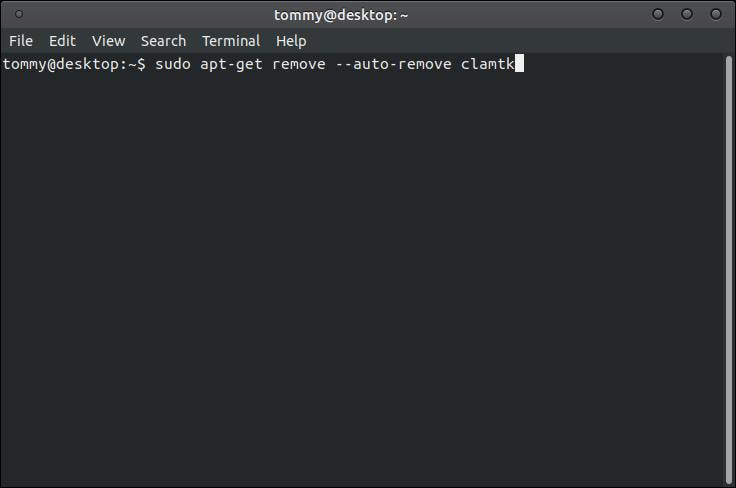
Uninstall clamtk and its dependencies
sudo apt-get remove --auto-remove clamtk
This will remove the clamtk package and any other dependant packages which are no longer needed.
sudo apt-get remove --auto-remove clamtk
This will remove the clamtk package and any other dependant packages which are no longer needed.
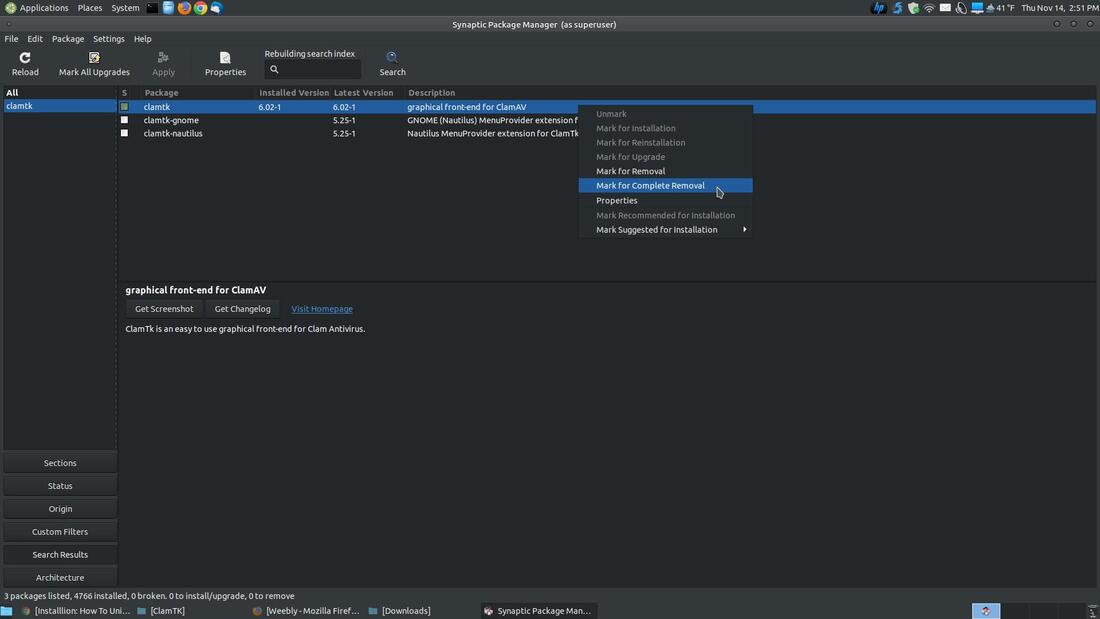
You can use the Synaptic Package Manager (as superuser) to remove ClamTK. Search for clamtk and then click on the file to select it from the list. Then right-click the file and select Mark for Complete Removal.
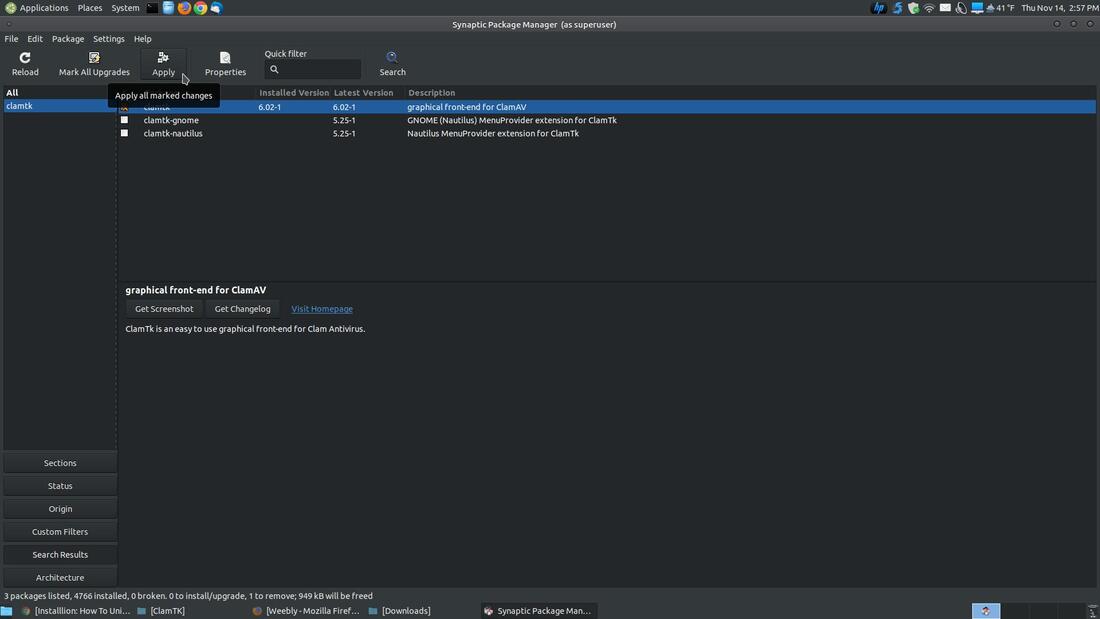
Then click the Apply button to start the removal process.
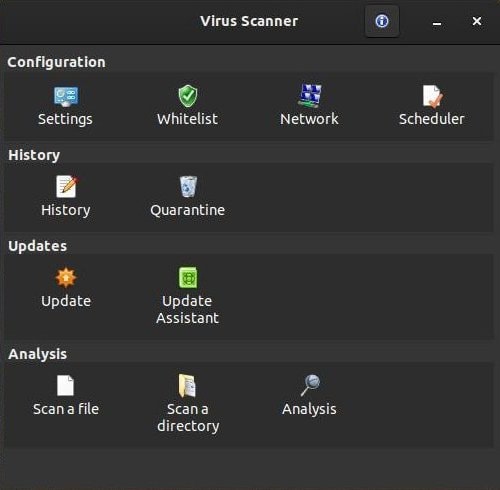
The appearance of ClamTK will vary according to the theme and/or icons that you are using on your system. So the look of your program may look different than mine. On my desktop I am using a Customized Theme. I am using Adwaita-dark for my Controls, Vertex-Dark for my Window Border, a modified Cupertino-Mojave for my Icons, and a Breeze Pointer. I also use Ubuntu MATE 20.04.3 LTS on my desktop machine. All the icons within the program looked normal using the default Ubuntu MATE theme and icon set. Ambient-MATE for Controls, Ambient-MATE for the Windows Border, Ambient-MATE for Icons, and DMZ White Pointer.
One of my laptops looked great using a dark theme.
Software developers don't like individuals changing the themes of their programs because it can change the way it looks and behaves. So if you use a different theme or icon set on your computer and your ClamTK doesn't look normal or behave the way it should, then switch back to the normal or default theme or change it to a theme that works that you like.
I hope this helped you understand how to install the newest version of ClamTK and how to use the program. I also want too thank Dave M for creating this open source antivirus program and for maintaining it all these years.
Take care!
Take care!

Updated: Oct 30, 2023
Created: Nov 20, 2019
